Use Syncro's Policy Builder
Table of Contents
Syncro's Policy Builder helps you quickly locate our ever growing number of policy items. It also helps you see exactly what is enabled on the policy without having to sift through what isn’t. Best of all, the Policy Builder allows you to explicitly override policy items, meaning you can have a policy that disables something that was otherwise enabled higher up the inheritance tree. See also About Policy Inheritance.
You'll find eight (8) policy categories in the left panel of Syncro's Policy Builder:
| Policy Category | Description |
| Antivirus | Options include Disable Antivirus, Bitdefender, Emsisoft, OR Webroot. Antivirus software may require additional setup. |
| Miscellaneous | Options include Device Language and Device Uninstall Code. You can add both to a policy. |
| Monitors |
Options include Alerts, Drive Monitoring, Event Logs, Offline Alerts, Processes & Services, and Resource Usage. You can add multiple monitors to a policy. To set up Event Log Monitors and/or Processes & Services monitors, use the Event Log and Process & Service Monitoring policy modules, respectively. |
| Remote Access | Adds Syncro remote access via Splashtop to the policy (included in your subscription price). |
| Scripting | Options include Script Schedules and Setup Scripts. You can add both to a policy. |
| System Tray | Adds a System Tray to your policy that displays your Agent Contact Forms. |
| Third-Party Updates | Automatically install and update third-party apps. To set up Third-Party Updates, use the Third-Party Patch Management policy module. |
| Windows Updates | Automatically install and update Windows via your Windows Update policies. To set up Windows Updates, use the Windows Updates policy module. |
Subsequent sections of this document describe each of these policy categories in more detail.
Antivirus
Options include Disable Antivirus, Bitdefender, Emsisoft, Microsoft Defender, OR Webroot. Antivirus software may require additional setup. (You can only select one option from the dropdown.)
Note: Disable Antivirus explicitly disables antivirus for the policy.
Miscellaneous
Options include Device Language and Device Uninstall Code. You can add both to a policy.
Device Language sets the language for the supported device: 
You can require a 4-digit Uninstall Code for end-users to enter to uninstall Syncro from the control panel. This helps ensure your customers are unable to uninstall the Syncro agent unless you want them to. Check the box and type in the desired code: integers only, four digits max:

With this enabled, your customers will see a prompt (with your company's branding) when they try to uninstall Syncro from the control panel:

Note: If you uncheck the “Require a Code to Uninstall the Syncro Agent” box, this will override any parent policies that require the code. With this setting disabled, customers will be able to uninstall whenever they would like. See also About Policy Inheritance.
You can always uninstall the Syncro Agent by deleting the asset in Syncro, regardless if an uninstall code is enabled on the device.
Monitors
Options include Alerts, Drive Monitoring, Event Logs, Offline Alerts, Processes & Services, and Resource Usage. You can add multiple monitors to a policy.
Note: To set up Event Log Monitors and/or Processes & Services monitors, use the Event Log and Process & Service Monitoring policy modules, respectively.
Alerts
Select one or more triggers from the Add Trigger dropdown to display alerts when an agent syncs:

The following triggers are available:
- Antivirus Installed
- Application Crashes
- Device Manager Issues
- Firewall Enabled
- HD SMART Failure
- HDD Fragmentation
- Recent Blue Screen
For each trigger, check or uncheck the Alert and Auto-Resolve checkboxes as desired.
Note: Auto-Resolve is only available for select triggers. When enabled and an alert fires off, Syncro automatically resolves the alert once whatever triggered it is fixed; any Ticket attached to the alert is closed. The alert will still be logged on the Asset in the “Recent Activity” and “Monitoring Activity” sections of the Overview and Monitoring tabs, respectively.
Click a red X to delete a trigger.
Drive Monitoring
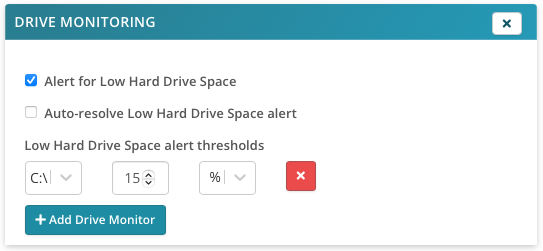
Drive Monitoring sets thresholds for low storage alerts on one or more drives. Any number of drives can be simultaneously monitored by free space in GB, or as a percentage:

“Alert for Low Hard Drive Space” is checked by default. If desired, check the “Auto-Resolve Low Hard Drive Space Alert."
Select a drive letter (A-Z), “System Drives” (those that have the OS on it), or “All Other Drives” (to monitor drives where the OS is NOT present).
Enter a number and select if the number represents GB or %.
Notes:
- Drives listed here that do not exist on any given asset are ignored.
- Drives not implicitly listed here will not alert for low storage space.
Monitors added at the current level do not override those in parent levels, rather, they add to them. For example, if you add a monitor for the D drive at the current level and one of the parent levels has a C drive monitor, then assets at the current level and below will monitor both the C and D drives. See also About Policy Inheritance.
Highly Recommended: Get notified when something is auto-resolved by checking the “RMM Alert - Was Auto-Resolved” box in a Notification Set.
Event Logs
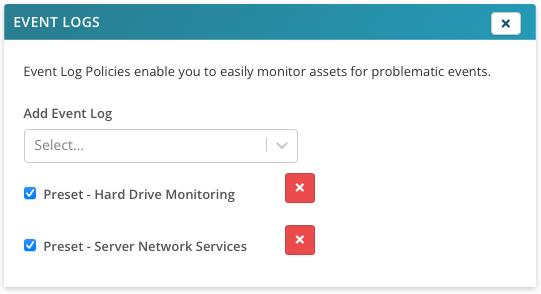
Event Logs help you monitor assets for problematic events.
Select one or more presets from the Add Event Log dropdown:

The following options are available:
- Preset - Hard Drive Monitoring
- Preset - Server Network Services
- Preset - Windows Backup
- Preset - Exchange Server
- Preset - Battery Backup (UPS)
To add more or edit the existing alerts, first save your current policy (if needed). Then select “Event Log Monitoring” from the Policy Modules button menu in the upper-right corner.
See also: Work with Event Log Policies.
Offline Alerts
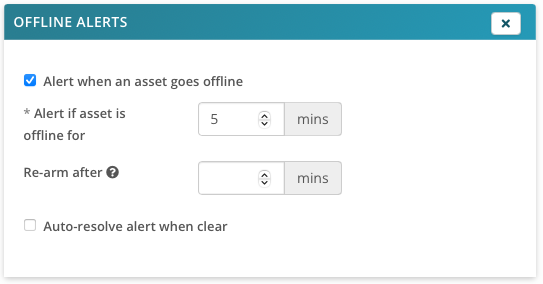
Offline Alerts notify you if the agent has been offline for the number of minutes entered. The “Re-arm After” setting tells the Syncro to notify you again after a certain amount of minutes have passed:

Note: The “Re-Arm After” feature will only activate if you specify a value is set. Otherwise, it will be disabled.
Processes & Services
Process and Service monitors help you manage alerts and automations around starting, stopping, and running processes and services.
Select “Process & Service Monitoring” from the Policy Modules button menu in the upper-right corner.
See also: Work with Process & Service Monitors.
After you've defined one or more Process and Service Monitoring Policies, you can click Add Monitor to select them:

Resource Usage
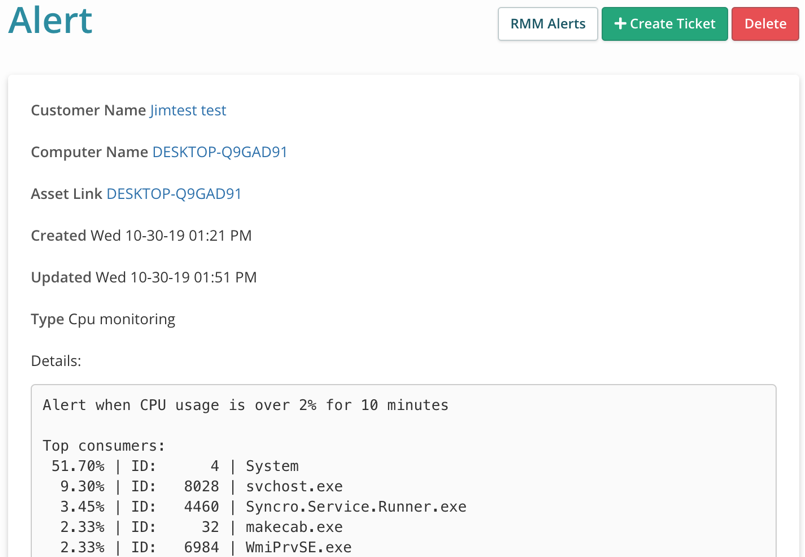
Resource usage alerts help you monitor CPU and memory usage exceeding a certain percentage for an average period of time.
Select one or both options from the dropdown, then enter the percentage(s) and timeframe(s) for each:

Resource usage alerts include the highest processes that triggered the alert, so you know the biggest contributing factor(s):

Remote Access
Syncro Remote Access (Splashtop)
Remote Access is for using Splashtop to remotely access your assets:

See Enable Remote Access and Remotely Access a Machine via Splashtop for more information.
ScreenConnect (BYO)
For this section to appear, first configure ScreenConnect.
Then you can then check the “Install & Manage ScreenConnect” box to have ScreenConnect installed with the policy:

Scripting
Script Schedules
You can automatically run scripts on a schedule for any assets assigned this policy.

Click +Add Entry, then select a script using the dropdown menu. You can select any default Syncro scripts, scripts you create, or scripts you download from the community library here. See also Manage Scripts.
Specify when you'd like the script to be run (from every 15 minutes to monthly). If you want to skip assets that are offline, check that box. Depending on the script you select, additional fields for you to complete appear.
Click +Add Entry as many times as you like to add additional script schedules.
Setup Scripts
You can automatically run a script on an asset whenever the policy is applied to that asset (including fresh installs or when switching to a new policy).

Click +Add Entry, then select a script using the dropdown menu. You can select any default Syncro scripts, scripts you create, or scripts you download from the community library here.
Specify when you'd like the script to be run:
- Always—the script will run every time an asset is assigned this policy.
- If Never Run—the script will run if the asset has never run the script before.
- If Not Run Within Past…—the script will run if the asset has not run the script in N days, where you can set N to any positive integer.
Depending on the script you select, additional fields for you to complete appear.
Click +Add Entry as many times as you like to add additional setup scripts. Use the triple line icon (![]() ) to drag and rearrange the order in which the scripts run.
) to drag and rearrange the order in which the scripts run.
System Tray
You can add menu options to the system trays of the assets you manage for your customer.
For example, you can add a contact form that helps your customer submit a request/open a Ticket, or begin a live chat session with a technician. See also Automatically Create a Ticket From the System Tray.
When you select the System Tray Section from the dropdown, the section is added to your policy with the Hide System Tray box checked by default. Uncheck this box and then click +Add to pick a Menu Type you want to include:
Enter a Menu Title, which is how the menu will show to customers in the system tray. Then depending on the Menu Type, enter and/or select additional options.
Click +Add as many times as you like to add additional menu items. Use the triple line icon (![]() ) to drag and rearrange the order of the items.
) to drag and rearrange the order of the items.
Menu Types include the following:
- URL—send End Users to a specific URL.
- Customer Portal—shortcut to the Organizations' End User Portal.
Note: The asset must already have an assigned End User with a Portal User setup to be directed to the full End User Portal. Assets without assigned End Users or with assigned End Users who do not already have a portal user configured will be directed to the New Ticket creation page. - Download a file—End Users can download a file.
Note: The URL must be a direct download link. - Send Email—End Users can send an email directly to a specific email address.
- Execute a CMD—End Users can run simple command line strings.
- Display some text—shows custom text you provide in the system tray.
- Insert Divider—places a separating horizontal line in the system tray to help with organization when there are multiple menus.
- Agent Contact Form—after you build one or more Agent Contact Forms, select the one you want for End Users to use to create new Tickets. Any tickets created from here are automatically assigned to the End Users on the asset. If there is no assigned End User on the asset, the ticket will be created without an assigned End User.
- Live Chat—provide an Unavailable Message to display if no response is received after 3 minutes (not configurable), then optionally select which technician to assign the chat to. See also: Chat with End Users from the System Tray.
Third-Party Updates
Third-Party Updates/Third-Party Patch Management facilitates the automatic installation and updating of third-party applications.
Select Third-Party Updates from the dropdown, then select which of your Third-Party Patch Policies to use.
Note: If no options exist in the dropdown, click Third-Party Patch Policies to create one in a new tab/window. You can also manage existing third-party patch policies from there.

See also: Third-Party Patch Management.
Windows Updates
Windows Updates help you automatically keep your clients' OS and applications up-to-date. You can feel confident your customer's assets are updated regularly.
Read on, or watch this short video to learn more:
Select Windows Updates from the dropdown, then click +Add Windows Updates Policy and select which of your Windows Update Policies to use.
Note: If no options exist in the dropdown, click Windows Update Policies to create one in a new tab/window. You can also manage existing windows update policies from there.

IMPORTANT:
- If you're adding multiple Windows Updates Policies, know that these are not validated against each other; make sure your settings make sense when used together.
- The Syncro Agent will always act based on the Windows Update schedule currently being run.
- Global exclusions are always respected.
See also: Windows Update Management.
