Windows Update Management
Table of Contents
Use the Windows Updates policy module in Syncro's Policy Builder to set how Window updates are managed and installed.
For supported versions of the Windows operating system, you can schedule when updates should be run, how individual categories and severities of updates are handled, which updates may need to be explicitly blocked, and when to schedule required reboots.
About the “Windows Updates” Policy Module
You can use the Windows Updates policy module to:
- Build templates to apply Windows Update schedules to your assets based on their policies,
- View all missing patches on an asset,
- View a history of recently installed patches (even before a Syncro agent was installed),
- Push a button to install all available patches for an asset in real-time,
- Push a different button to install individual patches to an asset in real-time,
- Click a KB number next to a patch to view Microsoft’s documentation about it,
- View a report of all assets that are missing Windows Updates,
- View a report of all patches that have not been installed on your assets,
- Create saved asset searches to find assets that are missing specific updates, and install them, and/or
- Check for new updates every 24 hours.
However, you can't use Syncro's Windows Updates policy module to do the following:
- Uninstall or remove existing patches,
- Install feature updates,
- Install updates for Microsoft products, such MS Office for Desktop.
Note: Syncro does maintain feature update scripts available for download in the community script library.
Create a Windows Update Policy
To create a Windows Update that you can later use in the Windows Updates section of Syncro's Policy Builder, follow these steps:
- Navigate to the Policies tab. The Policies table displays.
- In the upper right, click Policy Modules and select Windows Updates:

Syncro displays the Windows Update Policies table:
- Click +New Windows Update Policy. Syncro displays the Create Windows Update Management Policy page:
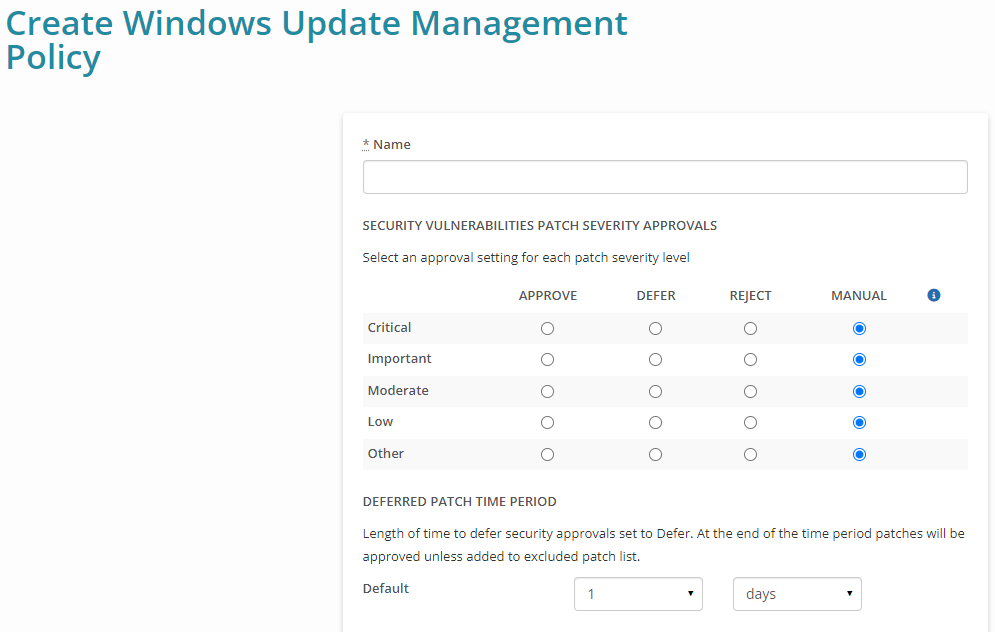
Note: There are some settings that are predefined, but you can change any you like. - Give your Windows Update Policy a descriptive Name.
- Use the following sections to set Security Vulnerabilities Patch Severity Approvals and/or Windows & Microsoft Patch Category Approvals, Deferred Patch Time Periods, Specify a Schedule, Set Patch Exclusions (including Global ones), and a Reboot Specification.
- Click Save. You can now use the Windows Update Policy in the Windows Updates section of Syncro's Policy Builder for assignment to assets. See also: Assign a Policy.
Select Security Vulnerabilities Patch Severity Approvals
In the SECURITY VULNERABILITIES PATCH SEVERITY APPROVALS section, select an approval setting for each patch severity level (Critical, Important, Moderate, Low, Other—i.e., a catch-all for anything not described in the other severity levels):
- Approve: Patches will be automatically installed during the next scheduled installation period.
- Defer: Patches will be automatically installed during the next scheduled installation period once the delay/deferment period has passed. This gives you time to review any patches for problems before they get automatically installed; they will show up in the Missing Patches section of the Assets. The default deferment period is 1 day.
- Reject: Patches will NEVER be installed during the scheduled installation period. This can be overridden by going to the Rejected Patches section of an asset and clicking Install by a rejected patch. This can only be done by Global Admins and those who belong to a Security Group with the “Assets - Allow Installation Of Rejected Patches” box checked.
- Manual: This is the default setting. Patches will NEVER be automatically installed during the scheduled installation period, but are available to install from the Asset (record) or Windows patches report.
Specify the Deferred Patch Time Period
In the DEFERRED PATCH TIME PERIOD sections, specify the length of time to defer security approvals set to Defer. You can set it up to 30 days or 52 weeks. At the end of the time period patches will be approved unless added to excluded patch list.
Note: Once the defer period has passed, any deferred updates be installed in the next scheduled install cycle, defined in the SCHEDULE SPECIFICATION section, rather than immediately. For example, suppose the Default is set for 2 weeks and the Schedule Specification is set to every Tuesday. If a patch gets released on Saturday, it will sit for two Saturdays so you can review it. After that, the patch will automatically get installed the following Tuesday.
Select Windows & Microsoft Patch Category Approvals
In the WINDOWS AND MICROSOFT PATCH CATEGORY APPROVALS section, select an approval setting for each patch category (Critical Updates, Update Rollups, Services Packs, Feature Packs, Definition Packs, Driver, Other): 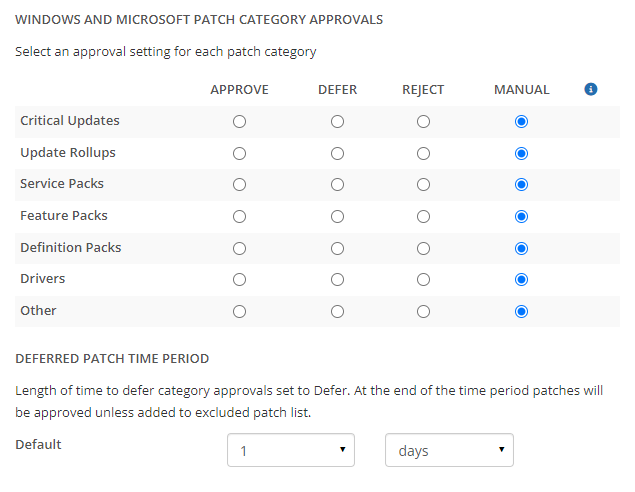
Note: See Security Vulnerabilities Patch Severity Approvals for descriptions of the approval settings.
Schedule Specification
In the SCHEDULE SPECIFICATION section:
- Use the "Start Updating At" dropdowns to select the time of day (in 24 hour format) to start installing Windows patches and updates:
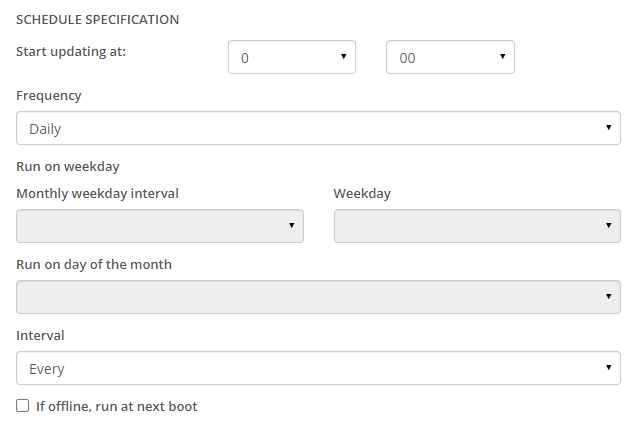
Notes:- Depending on your selections, other fields may enable/disable.
- Patch updates are based on the Asset's local time. If there is an issue with the asset's system time in Windows, then the updates will run at an unexpected time.
- Use the “Frequency” dropdown to select how often to install the updates—Daily, Weekly, or Monthly, then further define it:
- Daily: select the daily Interval—Every day, Every Other Day, Every Third Day, or Every 4th day.
- Weekly: use the “Weekday” dropdown to specify which day to install the updates, then select the Interval (same options as Daily).
-
Monthly: if desired, use the “Monthly Weekday Interval” dropdown to specify which time of the month (First, Second, Third, Fourth, or Last). If desired, select the "Weekday" and “Day of the Month.” You must specify an Interval. Here are two examples of what you can do:
- To install the 2nd Wednesday of every other month: set Monthly Weekday Interval=Second, Weekday=Wednesday, and Interval=Every Other.
- To install on the 8th every three months: set Run On Day of Month=8 and Interval=Every Third. (Monthly Weekday Interval and Weekday are empty/clear here.)
- If desired, check “If offline, run at next boot” and enter the Delay in minutes. If an asset is offline during the update window, the updates will be installed this number minutes after the machine boots.
Patch Exclusions
Note: Driver updates from third-party vendors distributed through Microsoft might use their own internal versioning and identification systems and deliver it through Windows Update without an associated KB article. Since it does not have a KB number, you cannot specifically exclude it. However, you can set the category of Drivers to Reject in a Windows Update Policy, then selectively install the ones you want.
If there are specific patches you never want installed, follow these steps:
- Click +Add Exclusion in the PATCH EXCLUSION LIST section:

The Patch Exclusion List displays with fields so you can enter the specific KB Number and a Description of the patch you're excluding:
- Click +Add Exclusion as many times as you like to add more. Click the red X to remove any patch exclusions.
Note: Patches excluded here can be used on a per-policy or per customer basis. For example, you can exclude patches based on asset type (e.g., Servers only), or for customers who have different requirements (i.e., banking vs. medical industries). - In the GLOBAL PATCH EXCLUSION LIST section, click Manage Global Exclusions:

In a new tab, Syncro displays the Global Patch Exclusion list:
Note: Global Patch Exclusions allow you to exclude patches from ALL asset policies. All of your patch policies automatically inherit anything in the global patch exclusion list. You can also find these under Admin > RMM Settings - Global Patch Exclusions. - Click +Add a Global Patch Exclusion to open the Add Global Patch Exclusion pop-up window, which displays fields so you can enter the specific KB Number and a Description of the patch you're excluding:
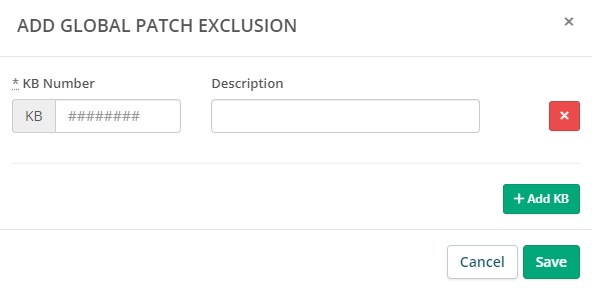
- Click +Add Exclusion as many times as you like to add more. Click the red X to remove any patch exclusions.
- When you're finished adding Global Patch Exclusions, click Save. Syncro displays your exclusions in the Global Patch Exclusion List:

- Refresh the Create Windows Update Management Policy tab to see your list appear here:

Reboot Specification
In the REBOOT section, use the dropdown menu to specify what should happen if Windows wants to reboot after installation: 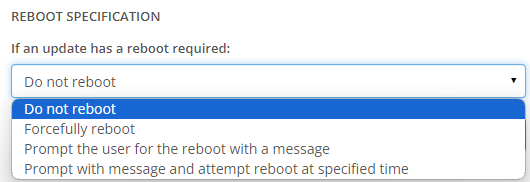
- Do not reboot: The agent does not trigger any reboot action.
-
Forcefully reboot: The agent will immediately reboot the asset when the Windows Updates finish installing.
IMPORTANT: Do not select this option without entering a Reboot By time. If you leave this blank, Syncro will reboot the asset whenever it is necessary to complete the updates; this can potentially shut down the machine when in use. You can always reboot the asset after installing updates at a different time via a script, task scheduler, etc. if you are unable to enter a Reboot By time. -
Prompt the user for the reboot with a message: The agent will present a pop-up that will use the message you enter in the Reboot Message field. If left blank, Syncro will display the default message: “Updates were installed and the machine needs to update.”
If the end user clicks “Allow,” the reboot happens immediately. If the end user clicks “Deny” or closes the prompt, the system will be put in a “Pending Reboot” for you to manage at a later time. -
Prompt with message and attempt reboot at specified time: Syncro will display the Reboot (or default) Message, and the agent will reboot automatically at the time you select in the Reboot By dropdown menus.
If the end user clicks "Allow," the reboot happens immediately. If the end user clicks “Deny” or closes the prompt, the prompt is dismissed until the Reboot By time, when the agent will trigger a system reboot.
Edit or Remove a Windows Update Policy
- Navigate to the Policies tab. The Policies table displays.
- In the upper right, click Policy Modules and select Windows Updates:

Syncro displays the Windows Update Policies table with your existing Windows Update Policies listed:
- Click a policy's hyperlinked Name or the edit (pencil) icon to edit it. Alternatively, click the red X to delete it.
