
Add Billable Time to a Ticket
Table of Contents
In Syncro, any Ticket Line Item associated with a Labor Rate (product) and not specifically excluded as non-billable is what you can charge to a customer.
This document describes two ways you can add billable time to a Ticket: one is manual, via the Ticket's Communications section. The second allows you to automatically populate time entries in a ticket for invoicing using a Ticket Timer/Labor Log.
Use the Ticket's Communications Section
To manually add time when submitting an update or adding a comment to a Ticket, follow these steps:
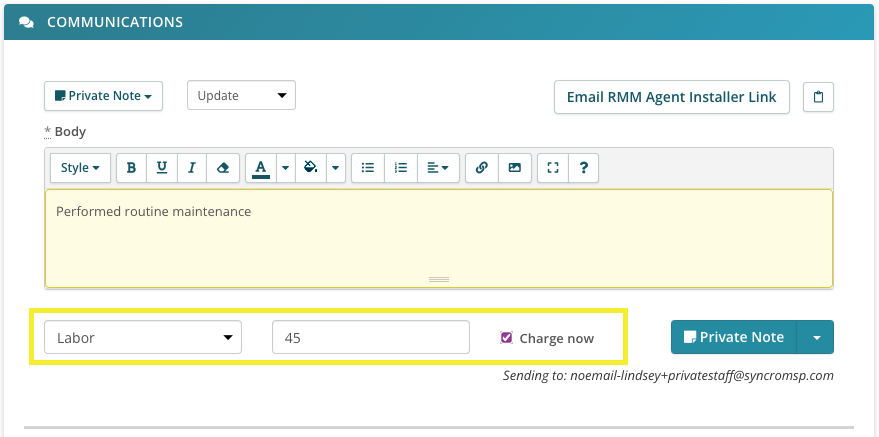
- Navigate to the Tickets tab/module, and click a ticket number to open that ticket's Details Page.
- Scroll to the Communications section and complete any fields.
- At the bottom, select the appropriate Labor Rate from the dropdown menu, then enter the minutes spent.
- Check the "Charge Now" box. This converts any timed labor entries to charges, which then can be invoiced:
Notes:
- Anything in the Products and Services table with a category of “Labor” appears in the Communications section's dropdown menu. To see a list of Labor Rates/Products, navigate to the Products and Services tab and select “Labor” from the Filter by Category dropdown.
- If you select a non-billable Labor Rate from the dropdown menu, Syncro does not display the “Charge Now” box.
- Click the button in the bottom right to submit the communication. For more information about the different types of communications, see About the Ticket Communications Section.
Use a Timer to Capture Billable Time for a Ticket
You may also decide to set a timer when working on a Ticket. Read on, or watch this short video to learn more:
- Navigate to the Tickets tab/module, and click a ticket number to open that ticket's Details Page.
- Scroll to the Labor Log section, which contains the Ticket Timer:

Note: If you don't see the Labor Log section on a ticket's Details Page, make sure the “Enable Ticket Time Tracking Module” box is checked in your Ticket Settings. - Use the Rate dropdown menu to select the Labor Rate, and optionally add a Note to describe the work being done. This field expands to allow for multiple lines of text.
Note: Anything in the Products and Services table with a category of “Labor” appears in the Rate's dropdown menu. To see a list of Labor Rates/Products, navigate to the Products and Services tab and select “Labor” from the Filter by Category dropdown.
- Click the Play icon to start the Ticket Timer. Syncro changes the Play icon to a Pause icon.
- When you're finished, click the Stop icon. A line item showing the Rate, Actual Time/Billable Time (as clock time), Tech, Status, and Date appears in the Labor Log table, and a running Total for your Actual and Billable time displays at the bottom of the section.
Notes:
- The individual rows shown in the Labor Log include labor recorded using the Ticket Timer and any time manually recorded using the Ticket's Communications section.
- If there is already labor logged in a ticket, the Ticket Timer starts from the total amount of labor already logged. For example, if you previously logged 45 minutes of labor and then start the timer, it starts from 45:00.
- You'll use View Log when adding ticket charges to an invoice. See Prepare an Invoice From Ticket Charges for details.
Tips:
- Use the Pause icon to pause an active timer, then click the Play icon to resume.
- You can kick off a new timer of the same Labor Rate/Product using the Play icon. Or, begin a new timer by changing the value in the Rate dropdown menu.
- Your three (3) most recent log entries display in the Labor Log; click the “more” link to open the Ticket Timer Log window.
- Timer indicators are as follows:
| Status | Indicator |
|---|---|
| A timer is active | Current Time Entry is black (or white in Dark Mode). Green dot labeled “Running” |
| No timers are active | Current Time Entry is light gray. No dot/label. |
| A timer is paused | Current Time Entry is black (or white in Dark Mode). Orange dot labeled “Paused” |
Multiple Ticket Timers
It's is possible to have multiple ticket timers running at once. There are two ways you can view all the ticket timers presently running:
First, a stopwatch icon appears in the Syncro header. It shows a number in a red circle to indicate how many active ticket timers there are. Click the icon to see a list of tickets with running timers:

Click into an individual ticket to view its Ticket Details Page and access the Labor Log section with the running timer. Or, click All Active Timers to display the Active Ticket Timers page:

From this single page, you can use the icons to pause, stop, or resume playing any active ticket timers. You can also see information about the:
- User: The tech who started the ticket timer.
- Customer: The (Customer) Organization associated with the ticket.
- Ticket: The number and hyperlink to the ticket.
- Ticket Title: The subject of the ticket.
- Labor: Which type of labor is associated with the ticket timer.
- Duration: The current length of time the timer has been running for the ticket.
The alternative path to the Active Ticket Timers page is to navigate to the Tickets tab/module and select “Active Timers” from the View button menu:

Note: All Global Admins have the ability to see Active Ticket Timers. Non-Global Admins require the “Ticket Timers - Overview” box to be checked in their Security Group.
Ticket Timer Settings
Under Admin > Tickets - Labor Type Time Requirements, you can specify different minimums and increments based on Labor Type. See Specify Labor Type Time Requirements for instructions.
Under Admin > Tickets - Preferences, you'll also find the following settings related to the Ticket Timer:
- Ticket Timer - Time Is Billable Time by Default
- Ticket Timer - Time is Non-billable by Default
- Labor Product for Ticket Timer Labor Charges
- Customize Text for Ticket Timer Charges
See Ticket Settings Reference for detailed descriptions.
Security Settings for Ticket Timers
There are security permissions Admins can set that allow Syncro Users to interact with Ticket Timers.
- Navigate to Admin > Syncro Administration - Security Groups, then click Edit for the desired security group.
- Scroll to the Ticket Timers section, then check either the header box to allow all actions, or individual boxes as desired.
- Click Update Group to save your changes.
- Then, make sure any desired Users are in that security group!
See also: Configure Security Groups and Add & Assign Users to Security Groups.