
Configure Security Groups
Table of Contents
Syncro lets you specify granular permissions for any Syncro Users who are not Global Administrators. These permissions define what these users can view, create, edit, and delete at an individual or category level.
A Security Group is a collection of individual permissions. Once you have created Security Groups, you can create and assign users to those groups so they can access and do only what you want them to.
Notes:
- Global Admins cannot have security permissions imposed on them; they always have full access. All Global Admins can also delete other Syncro Users (including other Global Admins) and change billing information. Therefore, it's best practice to have the fewest number of Global Admins as possible—but at least two in case one accidentally gets locked out.
- The Security Groups you initially see in your Syncro account are examples. By default, all your technicians belong to a “Technicians” security group. You can edit the example groups, or create new ones.
You can read on, or watch this short video to learn more:
Create a New Security Group
To create a new Security Group, follow these steps:
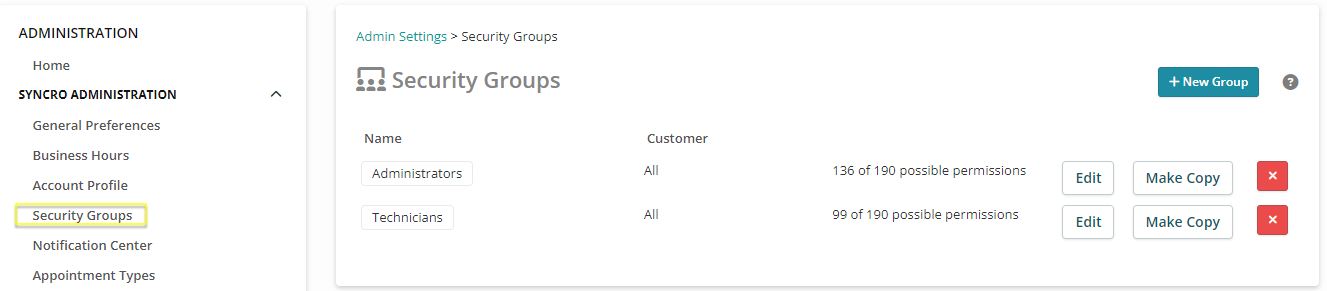
- Navigate to Admin > Syncro Administration - Security Groups. The Security Groups table displays:
- Click +New Group. The New Security Group page displays:
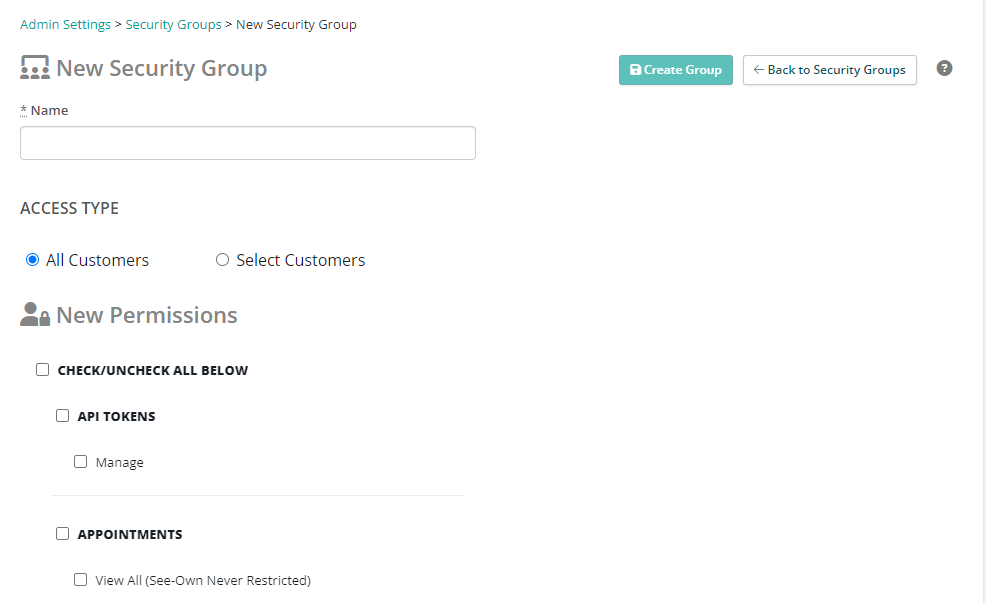
- Enter a Name for your Security Group.
- Select the Access Type for your Security Group.
Note: Most times, you'll leave the default Access Type of “All Customers,” which offers users wider access. Only switch to the “Select Customer” Access Type when there's a real need to prevent technicians from accessing the information of other Organizations. This Access Type has limitations in for what users in the group can see and do. Keep in mind that Security Groups are NOT a recommended way to divide up the work of your technicians by Organization. (For more information, see About Access Types.) If you do choose “Select Customers," you can then search for and move select Organization(s) to the Accessible panel using the Add → and ← Remove buttons in the list builder:

- Check the boxes next to the permissions you want Users in this Security Group to have. Review all permissions to ensure users in this group can access and action the correct functions in Syncro.
Tips:
- Use the "Check/Uncheck All Below" box, or the header box for a particular category of permissions (e.g. “Assets”) to quickly select/deselect multiple boxes.
- The Select Customers access type lets you restrict user access to particular Organizations. For example, if the access type for your Security Group is “Select Customers” and you check the “Assets” permission box, users assigned to this Security Group will ONLY have access to the Assets for those Organizations. For more information, see About Access Types.
- Click Create Group. Your new Security Group appears in the Security Groups table.
- Create and Assign Users to your Security Groups.
About Access Types
Syncro has two access types: All Customers and Select Customers:
| Access Type | Description |
| All Customers | Users in a Security Group that have this access type can see data/devices and change the selected security permissions for all of your Organizations. |
| Select Customers |
Users in a Security Group that have this access type can see data/devices and change the selected security permissions for one or more specific Organizations.
You specify which Organizations using the Accessible section of the list builder, and the Organization's Security Groups dropdown:
This helps to ensure that potentially sensitive information is only accessible to users who need it.
IMPORTANT: Limiting Users to a subset of Organizations also limits their Syncro functionality. Users in a Security Group with this access type won't be able to use:
|

Edit, Copy, or Delete an Existing Security Group
From the Security Groups table, you can edit, copy, or delete and existing Security Group using the buttons:

Edit re-displays the Security Groups page in edit mode so you can make any permission changes.
Make Copy duplicates the permissions to so you can easily update a few permissions and then rename the group.
When you click the Delete (red X) icon, you'll be asked to confirm your choice. Keep in mind that deleting a Security Group impacts all Users assigned to the group, so you may need to make additional User to Security Group assignments.