Work with Ticket Tags
Table of Contents
A tag is a simple label or keyword associated with a piece of information that helps you to organize and/or identify it. Ticket Tags provide you with an easy, flexible, and powerful way to categorize your Tickets beyond the filtration methods Syncro already offers.
You can use Ticket Tags to develop more dynamic and robust filtering for your Ticket Views.
About Ticket Tags
- Tags are designed for internal use; they cannot be seen by your customers.
- There's no limit to the number of tags you can create in your Syncro account.
- However, a single Ticket can have a maximum of 50 tags associated with it.
- A Ticket Tag can be no longer than 50 characters.
Create Ticket Tags
Unlike Ticket Issue Types or Custom Ticket Types/Fields, Ticket Tags do NOT need to be created in the Admin settings before using them. You add Ticket Tags into the Tags field on the fly, and Syncro automatically saves them.
As you create new tags, they’ll auto-populate in the RECENT and ALL TAGS sections of the drop-down when you click there.
- RECENT—the most recently used tags, scoped to your user activity.
- ALL TAGS—a list of tags based on matching the text you enter and associated with at least one ticket on the account. See also Delete Ticket Tags.
To create a new tag, type a name for the tag in the Tags field. Then press Enter or select the option to “+ Create” the new tag in the dropdown menu:

Delete Ticket Tags
To delete a tag, click the Tags field and select the ‘X’ to the right of that tag.
To delete all tags on the Ticket, click the Tags field and then click the 'X’ at the upper right corner.
Note: When a tag no longer exists on any tickets in the account, the tag is deleted and no longer shows up in the RECENT or ALL TAGS sections. Tags cannot be reinstated once deleted; they must be recreated and added to at least one ticket.
Ways to Use Ticket Tags
Note: The ability to see (and therefore use) Ticket Tags in various modules of Syncro depends on security settings.
In New Ticket Pages
Any tags added in the Tags field are automatically associated with the ticket after it’s created:
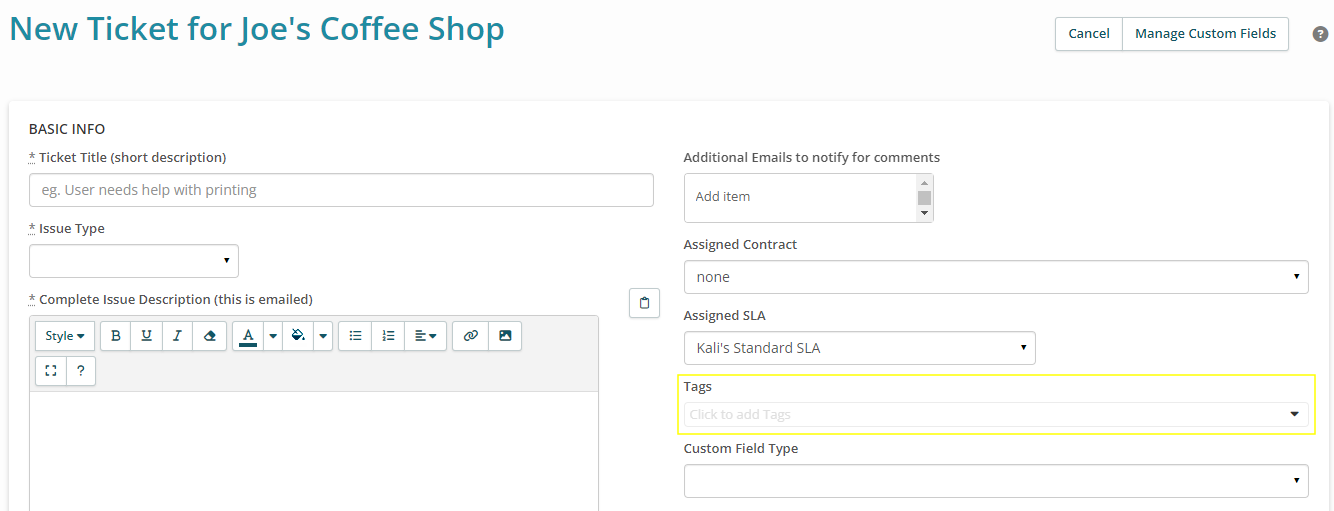
In Ticket Details Pages
There's a Tags field in the TICKET INFO section of a Ticket Details page, which displays whenever you open a specific ticket. It has the same functionality as in the New Ticket page:

In a Tickets Table Column
While not enabled by default, you can view and manage your Ticket Tags directly from a column in the Tickets table. The Tickets table displays when you navigate to the Tickets tab/module.
First, click the gear icon in the upper right corner, and add the Tags column to your table. If desired, reorder the columns to display the Tags column where you'd like it:

Now you can see which Ticket Tags are associated with your tickets:

Click the + or the edit (pencil) icon in the TAGS column to open a pop-up window so you can Edit Ticket Tags:
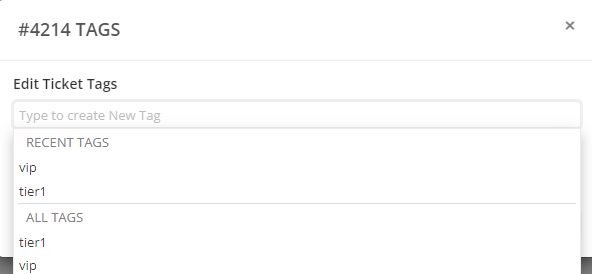
You can create new tags, (or if tags already exist for the Ticket, edit or remove them) here.
Click Save to close the pop-up and save your changes.
In Ticket Filters
The Tickets table displays when you navigate to the Tickets tab/module.
At the top right of the Tickets table is a set of filters, with Tag as an option:
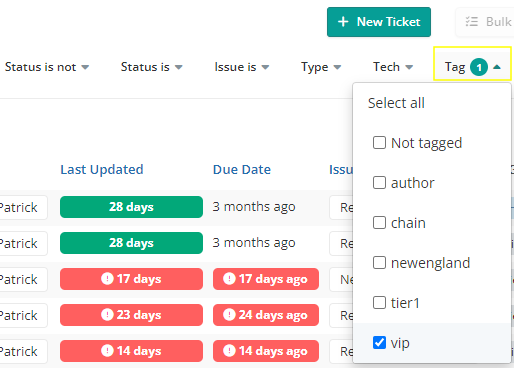
Check one or more of the boxes to filter the Tickets table based on the tags you select.
Notes:
- The first option is “Not Tagged,” so you can easily find and tag any tickets that aren't already organized with Ticket Tags.
- The list of tags in the filters dropdown only shows and lets you select from existing tags—specifically, any tag already associated with at least one ticket.
In Ticket Views
You can create Ticket Views that display only those tickets that are filtered by specific Ticket Tags (either included or excluded). You'll do this in the TICKET TAG PARAMETERS secion of the Update Ticket View pop-up window:

- Tag Includes: allows you to add any number of tags that exist in your account, and creates a View that includes any ticket with at least one of the tags selected here.
- Tag Excludes: allows you to add any number of tags that exist in your account, and creates a View that includes any ticket that does NOT contain any of the tags selected here.
- Untagged: checking this box creates a View that includes all tickets without at least one tag associated with them.
Notes:
- Entering tags in BOTH the Includes and Excludes fields will only return tickets that have AT LEAST ONE of the tags saved in the Includes field, and NONE of the tags saved in the Excludes field.
- The Untagged checkbox is an OR; so it can be used in combination with either the Includes or Excludes fields. For example, with one tag added in the Tag Includes field and the Untagged box checked, the View includes any ticket with the tag specified in the Includes field IN ADDITION TO any untagged tickets.
Example
Here’s an example of how to leverage Ticket Tags to drive team-based Ticket Views.
Let's say you want your dispatch team to triage incoming tickets and make sure they’re assigned to the appropriate support teams—either your Tier 1 or Tier 2 teams, specifically.
First, create a Ticket View that filters by all tickets with the status of New, which do not already have a Ticket Tag associated with them:
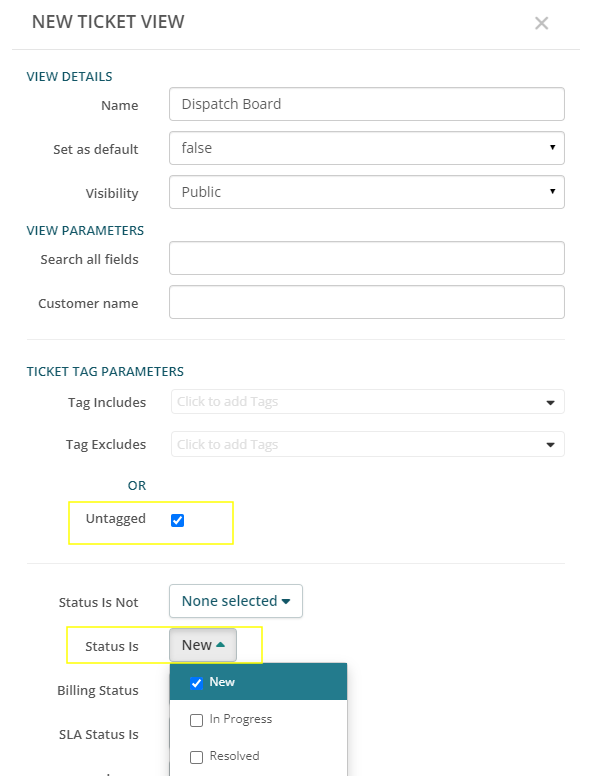
When you select the "Dispatch Board" Tickets View, any ticket with a Status of “New” without any Ticket Tags automatically displays:

Next, create Ticket Views for your Tier 1 and Tier 2 teams, only set these Views to filter based on Ticket Tags with corresponding team names:
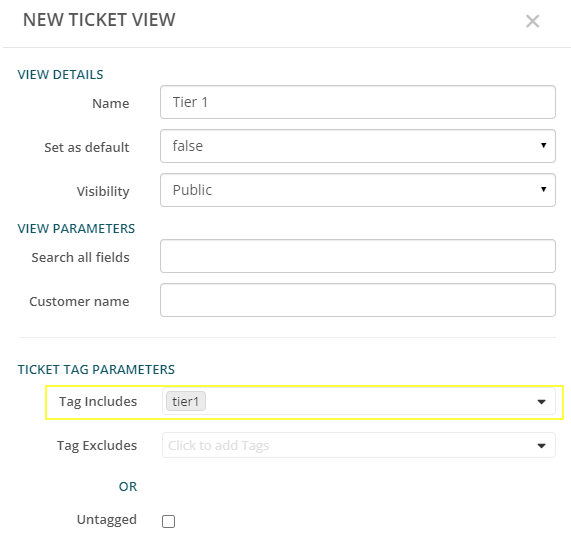
When you select the “Tier 1” Tickets View, any ticket with the Ticket Tag “Tier 1” automatically displays:

Note: Tier 2 View is not shown, but you'd create and see it similarly.
Now, when your dispatch team is triaging incoming tickets and adding Ticket Tags to them, these tickets will automatically appear in the corresponding team’s queues.
For example, as the “Tier 1” tag is added, see that the ticket automatically populates in the corresponding team’s view:

In Ticket Automations
Ticket Tags can be used in Ticket Automations as:
Bulk Edit Ticket Tags
You can update Ticket Tags for multiple tickets directly from the Tickets table.
Check the box to the left of one or multiple tickets, then select “Edit” from the Bulk Actions menu in the upper-right corner:

Tip: The box in the header row is a Select All.
Syncro displays the Bulk Edit Tickets pop-up window:
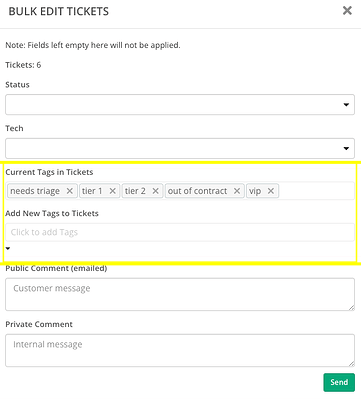
The "Current Tags in Tickets" field displays tags that span all the tickets you selected. Click the X to flag any tags for deletion.
Enter additional tags in the “Add New Tags to Tickets” field to bulk add them to all of the selected tickets.
Click Send to save your changes.
Notes:
- If you attempt to delete a tag for a ticket that doesn't have it, Syncro will simply skip that ticket. Similarly, if a tag you enter is already associated with a selected ticket, Syncro skips it when bulk applying the new tags.
- If a selected ticket already has the maximum of 50 tags associated with it, Syncro skips adding this tag to the ticket when performing the bulk action.
Ticket Tag Security Settings
Note: All Ticket Tag security settings are inactive by default.
There are security settings that Admins can use to change the level of access that Users have for Ticket Tags:
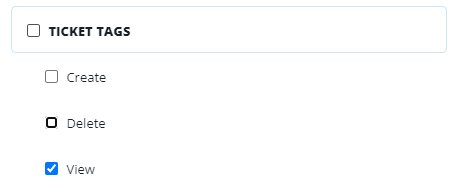
- Navigate to Admin > Syncro Administration - Security Groups, then click Edit for the desired security group.
- Scroll to the Ticket Tags section, then check either the header box to allow all actions, or individual boxes as desired.
- Click Update Group to save your changes.
Then, make sure any desired Users are in that security group!
See also: Configure Security Groups and Add & Assign Users to Security Groups.
Ticket Tags vs. Custom Ticket Types & Fields
Ticket Tags are:
- a great way to organize Tickets for different roles or teams within an organization (i.e., for Ticket Views),
- meant to live at a high level of a Ticket (i.e., they're not intended to contain job-specific information like API keys or MAV info),
- useful for flagging escalations beyond priority.
Custom Ticket Types and Fields are excellent for capturing:
- information necessary for a specific job (from high to granular levels),
- job-related data to help resolve a Ticket (e.g., site access information, more specific data about the issue beyond what is initially described).
If you want to convert Custom Ticket Type fields to tags, follow these steps:
- Use the Type ticket filter to get a filtered list of the tickets you want to update.
- Select all the tickets in that list, then Bulk Edit the Ticket Tags.
 Documentation Center