
Work with Policies
Table of Contents
A Policy is a collection of checks, monitors, and settings that reflect Standard Operating Procedures. Instead of configuring every device individually, you assign policies to Organizations or folders, and the assets within them inherit these settings automatically. You create and update policies to consistently configure RMM features like patch management, antivirus, and scheduled scripts, ensuring proper security and system maintenance across your fleet.
About Policy Inheritance
Syncro's policy structure leverages Policy Inheritance, which functions like a Group Policy Object (GPO) model. Think of policy inheritance as a waterfall. Settings flow down naturally unless you place an override at a lower level.
Key Concepts
Hierarchy & Propagation: Syncro automatically creates a policy folder named for each Organization and assigns the example Top-Level Policy. You can further organize assets into subfolders (up to five levels deep), assigning one policy per folder. Settings automatically propagate downward from the top level through all nested subfolders to the assets inside.
Direct Assignments & Exceptions: While assets naturally inherit settings based on their folder placement, you can apply a policy directly to an asset to create specific exceptions.
The Effective Policy: The Effective Policy is the final, merged collection of all settings applied to an asset. When settings conflict, the system generally uses the setting closest to the asset (i.e., the most specific level overrides the parent).However, drive monitors, scripts, system tray items, third-party patches, and Windows updates are additive rather than overrides. For example, if a parent policy has script A and the child policy has script B, the effective policy runs both.
Video
Watch this short video to see policy inheritance in action:
Example
Here's an example of one Organization's Assets & Policies subtab. You'll notice the folder structure mentioned above. It's not unlike one you'd have in Windows: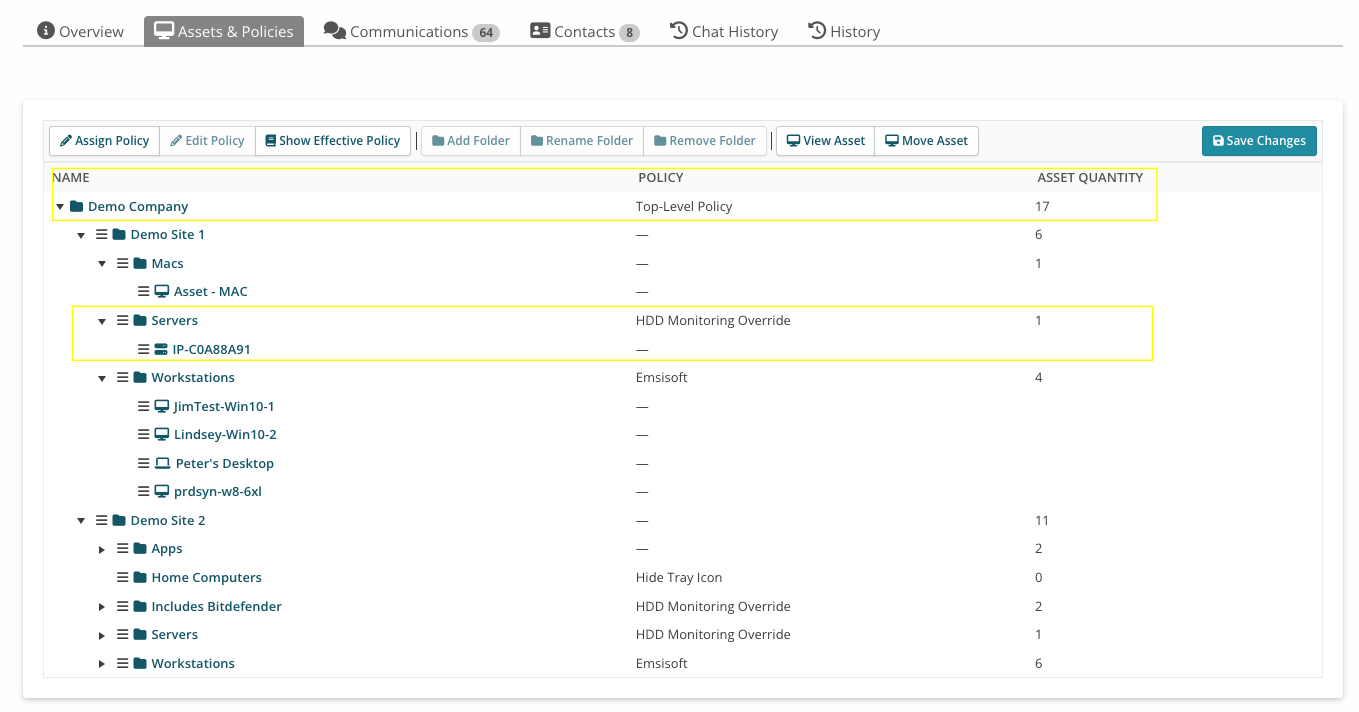
- Demo Company is the Organization's (top-level) folder.
- Demo Site 1 and Demo Site 2 are sub-folders.
- Inside the Demo Site 1 sub-folder are three sub-folders: Macs, Servers, and Workstations, and inside each of these sub-folders are assets (e.g. for Servers, the asset is called IP-COA88A91).
- Inside Demo Site 2 are five subfolders.
Look at the POLICY column to see what policy is being applied at each level:
- The three sub-folders of Demo Site 1 and the 5 sub-folders of Demo Site 2 inherit the policy called Top-Level Policy, because they're assigned to the Organization (top-level folder) named Demo Company and don't have any policies specifically applied to them (noted by the “—” in the POLICY column).
- The IP-COA88A91 asset inherits the policy called HDD Monitoring Override from the Servers sub-folder, as well as Top-Level Policy from the Demo Company folder.
- The assets in the Workstations folder inherit the Emsisoft policy and Top-Level Policy.
Best Practices
To maintain security and efficiency while reducing manual administrative work, we recommend the following structure.
- Define a Top-Level Policy: Create a Top-Level Policy that applies to all assets (e.g., basic security tools, remote access) and apply this at the Organization level. This ensures every current and future asset added to that Organization automatically receives your baseline security and monitoring settings. Adjust the default Top-Level Policy to automate onboarding of future clients in RMM Settings, and assign or bulk assign your Top-Level Policy to any existing Organizations.
- Use Sub-folder Policies by Role: Do not apply specialized settings to the top level. Instead, create policy sub-folders such as "Servers" and “Workstations” that match an endpoint's role. Then create specific policies and assign them to those sub-folders. For example, a "Server Policy" might have stricter patching schedules or different event log monitors. See also: Examples of Windows Update Policies.
- Leverage Inheritance: Allow the assets in the "Servers" folder to inherit the Top-Level Policy plus the server-specific rules from the sub-folder.
The benefits of following these best practices include reduced manual configuration time, ensures no asset is left without a policy, and that new assets added to “Servers” and “Workstations” folders, for example, automatically get the correct configuration.
You should also regularly review the "Applied Policy Report" to validate that patching and antivirus policies are enforced as intended across your fleet. This report also allows you to quickly identify devices that may have fallen out of compliance or been manually overridden. See also RMM Reports.
Create a New Policy
To start taking advantage of policy inheritance, you'll first want to create some of your own policies. Read on, or watch this short video to learn more:
To create a new policy, follow these steps:
- Navigate to the Policies tab. Any existing policies appear in the table:

- Click +New Policy. This opens Syncro's Policy Builder.
- At the top, enter a Name for the policy.
- In the left panel, click any of the eight (8) policy categories to begin adding things to your policy:

- Use the dropdown menu on the right side to add sections. (When all available sections are used, this dropdown menu is not shown.) See About Syncro's Policy Builder for more details about each category.
- Use the fields that appear to customize the settings. A bubble next to each policy category indicates its current number of sections.
- Several policy categories require you to select a larger group of settings that you set up in a policy module. These include: Monitors (for Event Logs, and Process & Services), System Tray (for Agent Contact Forms), Third-Party Updates/Patch Management, and Windows Updates. See Available Policy Modules for details.
- To remove a section, click the X in the upper-right corner of that section.
- Repeat step 4 to add more checks and monitors to your policy.
- Click “Policy Overview” at the top of the left panel to see a read-only view of everything you've configured for this policy. This is called the Effective Policy:

- When the Policy Overview looks correct, click Save Policy.
- Click Back to Policies to see the new policy in the Policies table. You can now assign this policy to your Assets.
Assign a Policy
Note: Policies cannot be assigned to manually created assets.
IMPORTANT: When you assign a policy to a folder, the policy propagates down to any subfolders and assets inside that folder. See About Policy Inheritance.
For a Single Organization
Read on, or watch this short video to learn more:
Follow these steps to assign a policy to an Organization's assets:
- Navigate to the Organizations tab. Any existing Organizations appear in the table.
- Start typing the name of an Organization into the search bar and click their name to open that Organization's Details Page.
- Select the Assets & Policies subtab.
- By default, the Organization has a folder that matches their name:

The Policy column displays the currently assigned policy, and the Asset Quantity shows you how many assets are assigned that policy. - Click on a folder, subfolder, or individual asset to select it, then click Update Assigned Policy.
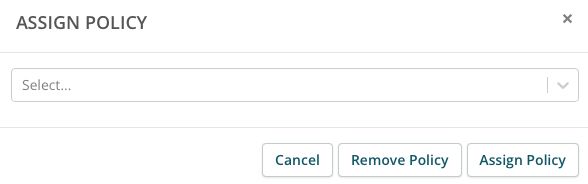
- In the Assign Policy window, select the new policy from the dropdown menu, then click Assign Policy.
To Multiple Organizations (Bulk Assignment)
When you have several hundred, or even thousands of customer Organizations, it can be tedious to go into each Organization to change their Top-Level Policy. Fortunately, Syncro provides a bulk assignment feature so you can set Top-level Policies across all of your Organizations with one simple action.
Follow these steps:
- Navigate to the Policies tab.
- In the upper right, click Bulk Assign Top-Level Policy:

- In the Bulk Assign Top-Level Policy window, select the policy you want to bulk assign. If you only want to apply the policy to Organizations who don't yet have a Top-level Policy assigned, check that box.
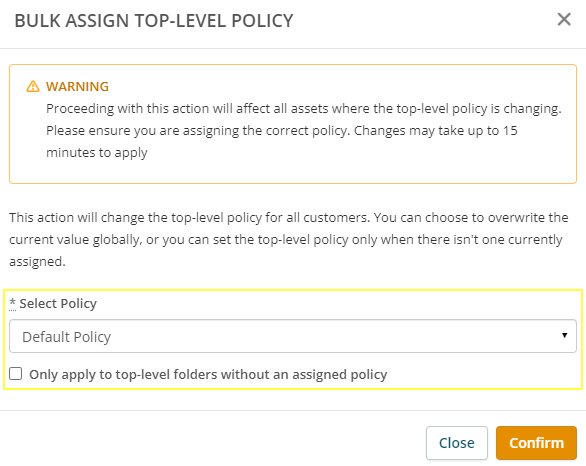
- Click Confirm. Changes may take up to 15 minutes to apply.
Edit a Policy
You can easily update your existing policies so that any assets assigned to that policy (either directly or through policy inheritance) automatically change their settings to match.
To edit an existing policy, follow these steps:
- Navigate to the Policies tab. Existing policies appear in the table.
- Click the hyperlinked name of a Policy to open it in the Policy Builder:

Note: Syncro's Policy Builder defaults to the read-only Policy Overview, which ONLY shows the current, Effective Policy. - Edit the Name of the policy if you want.
- In the left panel, click a policy category to edit its sections and customize the settings.
- Repeat step 4 until the Policy Overview displays the Effective Policy to be as you'd like it.
- Click Save Policy. Your policy changes are now in effect.
Remove a Policy
When you want to remove an existing policy, you can.
IMPORTANT: When you remove a policy:
- Any assets assigned to it (either directly or through policy inheritance) automatically change their settings to match.
- Please ensure that any applications installed on the asset via the policy are also removed (e.g., managed antivirus applications, or remote applications like Splashtop).
To remove an existing policy, follow these steps:
From the Assets & Policies Subtab
Since policies are assigned to Organizations and their Assets, you can remove policies from an Organization's Assets & Policies subtab. This is the preferred method, since it can be easier to see the effect the removal will have via policy inheritance.
- Navigate to the Organizations tab. Any existing Organizations appear in the table.
- Start typing the name of an Organization into the search bar and click their name to open that Organization's Details Page.
- Select the Assets & Policies subtab:

The Policy column displays the currently assigned policy, and the Asset Quantity shows you how many assets are assigned that policy. - Click on a folder, subfolder, or individual asset to select it, then click Update Assigned Policy.
- In the Assign Policy window, click Remove Policy:

The Policy column in the Assets & Policies subtab updates to show that the policy has been removed. - Click Save Changes. Your policy changes are now in effect.
From the Policies Tab
If you're certain you know how the removal of a policy might impact others via policy inheritance, follow these steps:
- Navigate to the Policies tab.
- Click Remove in the row for the policy:

If the policy is associated with at least one policy folder, the system warns you about it:
- Click OK if you want to proceed. The policy folders and/or assets lose their assigned policy and inherit from the remaining Effective Policy.
View the Effective Policy
To see the Effective Policy (i.e., the sum of all policies currently being merged and applied to a folder or asset):
- Navigate to the Organizations tab, then select a specific Organization.
- Click the Assets & Policies subtab, then click Show Effective Policy:

The Policy Overview tab of the Policy Builder displays, giving you a read-only view of everything currently enabled or disabled on the policy at any given level:
Alternatively, you could navigate to an Asset's Details Page and click the “View Effective Policy” link in the Overview:

Locate Assets by Policy Folder
You can create Saved Asset Searches to identify assets based on where they live in your policy hierarchy. This is particularly useful for isolating groups of devices (like Servers or Workstations) for reporting, bulk actions, script deployment, and automated billing.
Follow these steps to create a Saved Asset Search by Policy Folder:
- Navigate to the Assets & RMM tab.
- Click the magnifying glass icon with the + sign, located on the left side of the page:

This opens the Saved Asset Search sidebar. - In the Saved Asset Search sidebar that opens, click New Search.
- In the "New Saved Asset Search" pop-up window, enter a descriptive Name such as “Server Policies.”
- Scroll down to the Policy Folder Name field:

- Select “Equals” (or "Contains" if you want a broader match) from the dropdown menu.
- Enter the name of the policy folder you want to target (e.g., "Servers").
- Click Save.
This Saved Asset Search now dynamically aggregates all assets located within folders matching the name “Servers”.
See also: About the Assets & RMM Tab/Page.
Automate Billing Based on Policy Folder
To bill clients based on your policy folder structure (e.g., charging a specific rate for all assets in "Servers" or "Managed Workstations" folders), use the Policy Folder line item type in your recurring invoice. This method ensures your billing counts update dynamically as you add or remove assets to your folders.
See also: Work with Recurring Invoices and Line Item Types for Recurring Invoices.