
Structure Products & Services For Profit
Table of Contents
This guide outlines how to manage inventory and services by configuring global product settings, defining default labor rates, creating manual or imported products, attaching photos, and building predefined or ad-hoc product bundles.
Tip: If you plan to use the Products & Services module frequently, customize your tabs. Otherwise you'll find it under the More menu.
In Syncro, Products are generally physical items like cables, monitors, etc. Products may also refer to software products you license through a vendor and offer to the (Customer) Organizations you support. Services are often regarded as labor, or other activities or contracts you offer.
Step 1: Products & Services Settings
Before you start working with Products & Services, it's a good idea to look at the global settings. You'll find these under Admin > Products & Services - Preferences.
Here are a few settings you may want to review:
- Enable One-Time-Use Inventory Items: Check this box if you want Syncro to give you the option of disabling the product once it reaches a quantity of 0.
- Enable the Prepay Hours Tracking Feature: Check this box if you plan to sell blocks of service hours that you apply to an invoice at a later date. This feature is only useful if you sell Prepay Hours (Block Hours) as part of your contracts.
- Enable the Deposits Feature: Check this box if you want Syncro to give you the option of taking deposits for Tickets. (Discussed in Invoicing 102.)
- Enable Photos on Products: Check this box if you'd like an option to associate photos with your products (and/or for Step 4, below).
- Enable the Backorder Feature: Check this box to allow the use of Pending Orders when you sell products you don't yet have in stock.
Also included on the Products & Services Preferences/Settings page is the Category Editor. This editor allows you to customize Syncro to match how you organize your offerings:
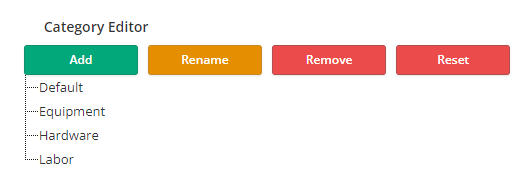
The values you specify in the Category Editor appear in the Category dropdown menu for when you create new Products or Services. They also appear as subtabs to help you filter the Products table.
![]() View the Products & Services Settings Reference for more details. (Bonus: Modify and/or create new categories using the Category Editor.) When you're finished making your selections, be sure to click Save.
View the Products & Services Settings Reference for more details. (Bonus: Modify and/or create new categories using the Category Editor.) When you're finished making your selections, be sure to click Save.
Step 2: Understand Labor Rates
Labor rates are a special type of Service associated with time-based calculations, where quantities are calculated as fractions of time.
Additionally, labor rates are closely linked to Tickets and Invoices, allowing for accurate billing based on the time Technicians spend on tasks. This differentiation helps streamline the invoicing process and ensures that labor-related charges are correctly categorized and billed to customers.
You can select a default labor rate for a specific Syncro User, which automatically appears whenever they use a Ticket Timer or update entries in the Labor Log. (See also: “Default Labor Product” in User Fields Reference.)
![]() Take a look at Create Labor Rates and decide if you want to want to add any in the next step.
Take a look at Create Labor Rates and decide if you want to want to add any in the next step.
Step 3: Create Products & Services
In Syncro, you can create a standard Product or Service with a Name, Description, Price/Cost, and tax information. You can also create Products/Services that are:
- Discounts (Amount or Percent): Select the appropriate "Discount" radio button to create a Discount you can apply to Invoices in the future.
- Maintain Stock: Allows you to track the quantity of an item, order from Purchase Orders, and receive alerts when the item is running low on stock. This ensures you're notified when it's time to reorder items to maintain adequate stock levels.
- Serialized: Enables the entry of unique serial numbers for the Product so you can maintain accurate records of each item instance in your inventory.
- One-Time Use: Automatically disables a Product after it reaches a quantity of zero. This is useful if you do not intend to restock items once they are sold out. (Requires the “Enable One-Time-Use Inventory Items” setting.)
- Labor: Items with a Category of “Labor” appear in a Ticket's Labor Log “Rate” dropdown menu, and have quantities calculated as fractions of time.
You can add to your inventory of products and services in Syncro manually or by using a CSV file to import them.
A. Create Manually
Watch this short video to learn how to create a Product manually. (This video also shows the addition of a Photo, which you'll do in Step 4.)
Once created, your products and services appear in dropdowns for selection throughout Syncro, including in the Ticket Line Items pop-up window and Line Items section of Invoices.
![]() Create at least one (each): Product, Labor Rate, and Discount. Use the Products & Services Fields Reference to help you with those not mentioned here. (Bonus:
Create at least one (each): Product, Labor Rate, and Discount. Use the Products & Services Fields Reference to help you with those not mentioned here. (Bonus:
B: Import Using a CSV File
When you first start using Syncro, or have many edits or additions to make to your Products, it's best to export your inventory to a CSV file, make the changes in Excel (or another spreadsheet program), and then import the file into Syncro.
![]() If you'd rather create your products and services via import, follow the step-by-step instructions in Import Products & Services.
If you'd rather create your products and services via import, follow the step-by-step instructions in Import Products & Services.
Step 4: Add Photos to Products
Product photos are used in multiple areas of our system to enhance visual representation and aid in product identification. You can upload photos to display with product details, include them on Invoices and Estimates, and use them in email marketing campaigns (Mailer). They also appear in the Point of Sale (POS) system for quick product selection.
Any images you upload must have either a .jpg or .png file extension. (Change any .jpeg extensions to .jpg before uploading.)
![]() Add a photo to a product from Step 1.
Add a photo to a product from Step 1.
Step 5: Create Product Bundles
Syncro offers two types of product bundles: Predefined Bundles and Ad-hoc Bundles. Both types of bundles streamline the invoicing process and help manage inventory effectively.
Predefined Bundles are useful for situations where you want to track inventory without showing the details of what's included in a line item to your client. When you create a Predefined Bundle, you'll give it a name, add items from your Products & Services list, and set an overall price. The system will handle calculations for taxable and non-taxable items included in the bundle. You can also create a UPC code for the combined bundle.
When adding a bundle to an invoice, it will appear as a single line item, but you can expand it to see the included items.
Ad-hoc Bundles allow you to create bundles on the fly while preparing an Invoice or Estimate. This feature enables you to track all inventory items and labor that goes into a bundle, but it will show as a single line item to your clients. Ad-hoc Bundles cannot be saved for reuse on future Invoices or Estimates, and they must be a quantity of 1.
To create an Ad-hoc Bundle, you can either add items first and then name the bundle, or vice versa. Once created, you can adjust the bundle's name, description, and price, and you can also add/remove items as needed.
![]() Create an ad-hoc bundle inside an Invoice. (Bonus: Read more about predefined bundles and optionally create one.)
Create an ad-hoc bundle inside an Invoice. (Bonus: Read more about predefined bundles and optionally create one.)
Next Steps
If you've completed these steps, you can access your Products & Services inside Syncro!
- Proceed to Invoicing Training Guide (102).
- Check out available documentation in the Invoices & Billing category.
- Explore the other available Training Guides.