Products & Services Settings Reference
Table of Contents
Navigate to Admin > Products & Services - Preferences to find all your product-related settings in Syncro.
This document describes what each setting does.
Checkboxes
- Send a Daily Low-Inventory Email: Check this box to make Syncro send a daily email (to the address specified in Admin > Parts - Preferences) that shows you all Low-Inventory items. (See also Parts Settings Reference.)
-
Enable Wholesale Pricing: Check this box to sell products and services at cost by checking the Wholesale box that will appear in your Line Items section:

- Enable Purchasing from the Public: Check this box to purchase products from your end users.
- Enable Syncro-to-Syncro Electronic Ordering: Check this box to set up and purchase from a vendor that uses Syncro.
- Enable One-Time-Use Inventory Items: Check this box to make Syncro display the "One Time Use" checkbox on Products & Services; this will mark them to be disabled once the stock runs out.
- Enable Percentage Markup: Check this box to turns the Percentage Markup feature on or off. When on, the Default Percentage Markup field also displays. Enter a number greater than zero to make Syncro automatically increase the price of Parts by that percentage. (You do NOT need to enter a % symbol after the number.)
- Show Categories: Each product you have can be placed in a category. Certain categories are necessary to perform functions, such as utilizing Prepay Hours. Show Categories also causes Syncro to display tabs across the top on the Products & Services list. You can add your desired categories to the list using the Category Editor.
- Enable the Prepay Hours Tracking Feature: Check this box to sell blocks of service hours that you apply to an invoice at a later date. This feature is only useful if you sell Prepay Hours (Block Hours) as part of your contracts. (This is also available in Customer Settings.)
- Enable the Deposits Feature: Check this box to accept payment deposits from your end users in Syncro. (This is also available in Invoice Settings.)
- Enable Photos on Products: Check this box to be able to upload and attach photos to your products.
- Enable the Backorder Feature: Check this box to sell stock you don't have (especially serialized items). This box may be checked by default for new Syncro accounts.
- Use Basic Labels Instead of Instance Labels on Non-Serialized Products: Check this box to use Basic Labels as the default and hide In-Stock Labels.
IMPORTANT: After changing Products & Services settings, be sure to click Save.
About the Category Editor
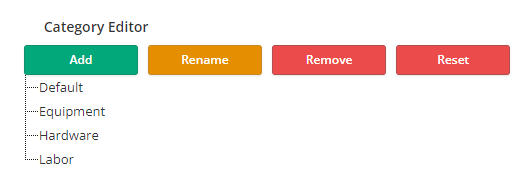
Syncro supports multiple levels of categories to help you organize your products and services. The Products & Services categories Syncro provides are: Default, Equipment, Hardware, and Labor, but you can change this.
You'll find the Category Editor at the bottom of the Products & Services Preferences page:

Click:
- Add: to create a new category at the bottom. By default the new category will be called “new node.” Type a name then click out of the field to save it.
- Rename: to put the category into edit mode. Type a name then click out of the field to save it.
- Remove: to remove a category. Click OK to confirm the deletion. If a removed category was in use for some products, Syncro displays nil.
- Reset: to reset the categories back to their original, Syncro-provided state. If a custom category had been used for some products, Syncro displays nil for those.
You can drag and drop any category to a different position in the list to reorder it.
To create subcategories, drag one category on top of another. A little triangle appears wherever there are subcategories. Click it to open that portion of the category hierarchy:

IMPORTANT: After changing Products & Services settings, be sure to click Save.
Tips:
- Now whenever you create a product or service, you'll be able to select the categories/subcategories you've defined here from the Category dropdown menu.
- Syncro can also display your top-level categories as tabs on the top of your Products page to make organizing and sorting products and services easier. You'll need to select Categories from the Default POS Tab field on the POS Settings page:

When set, the Products page might look like this:
See POS Settings Reference for more information.
