Work with Recurring Invoices
Table of Contents
A Recurring Invoice is a template from which many invoices can be created.
You can use Syncro's Recurring Invoice feature to generate and automatically send invoices to a customer. If you use an integrated Payment Gateway and a saved credit card, a recurring invoice can also automatically charge your customer.
Notes:
- Recurring invoices run at 6:00 AM local time. On peak days (the first of the month, for instance) they can take a couple of hours to finish.
- You cannot send a Recurring Invoice before it has been generated.
- Recurring Invoices are also referred to as Scheduled Invoices.
Read on, or watch this short video to learn more:
Create a Recurring Invoice
From the Scheduled Invoices Page
To create a recurring invoice, follow these steps:
- Navigate to the Invoices tab/module.
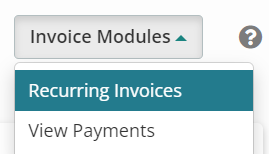
- From the Invoice Modules button menu, select Recurring Invoices:

The Scheduled Invoices page displays, showing any existing recurring invoices.
Tip: You can also navigate to the Schedule Invoices page from Admin > Invoices - Recurring Invoices.
- In the upper right, click New Schedule. The New Recurring Invoice page displays:

- Select a Customer name from the list and click Proceed.
- In the RECURRING SCHEDULE section, complete any fields for your invoice. Template Name, Frequency, and Run Next At are required fields:

Tip: You might use the "In Advance" period mode as protection coverage for the upcoming month. "In Arrears" may be appropriate for Backup Data Usage (for the previous month). See Recurring Invoices Field Reference for more information.
- In the INVOICE section, complete any fields to reflect how you'd like to bill your customers:

Tip: You can check the "Add any Pending Ticket Charges" box to automatically compile any billable time on tickets onto the resulting invoice. See Recurring Invoices Field Reference for more information.
- In the BILLING section, complete any fields to reflect how you'd like to bill your customers:

Tips:
- If you accept deposits or issue billing corrections as customer credit, check the "Automatically Apply Any Customer Credit" box so the credit balance is automatically applied to your customer's recurring invoices as they're generated.
- If you use stored Payment Profiles, check the “Auto Charge Payment Profile on File” box and select the credit card to use. Optionally check the "Retry the Payment Later if the Billing Fails" box.
- If you have a contract for the client, select it here. This will keep the recurring invoice aligned to the expiry data, and you can optionally have a ticket created to warn you about the upcoming expiration. The recurring invoice will also auto pause when the expiration hits so that you do not accidentally bill the client incorrectly.
- See Recurring Invoices Field Reference for more information.
- Click Create Schedule. The Recurring Invoice appears in the Scheduled Invoices table.
From an Individual Invoice
Note: In this path, Syncro already knows the Customer you want so you don't have to select them.
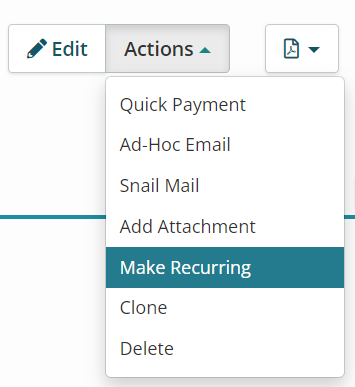
While viewing an individual invoice, you can decide to make it recurring using the Actions button menu. To do this, follow these steps:
- From the Actions button menu, select "Make Recurring":

Syncro displays the Add Recurring Schedule pop-up:
- Give the template used to create recurring invoices a name.
- Optionally, supply a name for the invoices generated from that template.
- Select the Frequency and the date to Start sending the invoices.
- If you use Stored Payment Profiles, check the “Auto Charge Credit Card on File” box and select the credit card to use.
- If desired, check the "Email Customer Payment Receipts" box.
- If desired, check the "Mail Physical Invoice (costs money)" box. See also: Recurring Invoices Field Reference.
- Click Create Schedule. Syncro displays the Editing Recurring Invoice Template page:

- Scroll down and use the "Recurring Type" dropdown to add any additional line items:

Note: Your selection will cause Syncro to display additional fields for you to complete. See Line Item Types for Recurring Invoices for more information. - Click Update Schedule to save your changes. The Recurring Invoice appears in the Scheduled Invoices table.
Identify Invoices That Are Recurring
You can quickly identify which Invoices are recurring on the Invoices tab by the refresh icon, located to the left of the Invoice number:
![]()
Tip: Hover over this icon to get the magnifying glass icon; click to open the Invoice Quick Preview.
On the Organization's Details Page in the Invoices section, a similar icon also appears to the right of the Invoice number:
![]()
Tip: Hover over this icon to see the name of the template used to create the recurring invoice.
Click Show Recurring Templates in the Invoices section header to change the Invoices section so that it now shows the recurring invoice the individual ones are based on (i.e., the template):

Click Show Invoices to toggle back to the Invoices view.
Edit or Delete a Recurring Invoice
You edit or delete a Recurring Invoice from the Scheduled Invoices page. Follow these steps:
- Navigate to the Invoices tab/module.
- From the Invoice Modules button menu, select Recurring Invoices:

The Scheduled Invoices page displays, showing existing recurring invoices.
Tip: You can also navigate to the Scheduled Invoices page from Admin > Invoices - Recurring Invoices.
- To edit, click the ellipses icon next to the Recurring Invoice you want to edit, then select Edit. Syncro displays the Editing Recurring Invoice Template page. Make any changes and click Update Schedule when finished. To close without saving, click Back.
- To delete, click the ellipses icon next to the Recurring Invoice you want to edit, then select Delete. Click OK to confirm.
Tips:
- You can also delete a Recurring Invoice by clicking the Delete button on the Edit Recurring Invoice Template page.
- To edit or delete more than one Recurring Invoice, see Bulk Edit, Delete or Bulk Run Recurring Invoices.
Duplicate a Recurring Invoice
You can make a copy / duplicate of a Recurring Invoice from the Scheduled Invoices page. Follow these steps:
- Navigate to the Invoices tab/module.
- From the Invoice Modules button menu, select Recurring Invoices:

The Scheduled Invoices page displays, showing existing recurring invoices.
Tip: You can also navigate to the Scheduled Invoices page from Admin > Invoices - Recurring Invoices.
- Click the ellipses icon next to the Recurring Invoice you want to duplicate, then select Duplicate:

- Select a Customer name from the list and click Proceed. Syncro displays the New Recurring Invoice page, with much of the information prefilled. The Template Name will have (copy) appended to it.
- Edit the Template Name to be more meaningful.
- Enter a value for the “Next Run At” field.
- Change any other field values you want. (See Recurring Invoices Field Reference for more information.)
- Click Create Schedule. Syncro displays your Recurring Invoices on the Scheduled Invoices page.
Bulk Edit, Delete and/or Bulk Run Recurring Invoices
You can make bulk edits to several Recurring Invoices at once, bulk delete Recurring Invoices, and/or bulk run Recurring Invoices from the Scheduled Invoices page. Follow these steps:
- Navigate to the Invoices tab/module.
- From the Invoice Modules button menu, select Recurring Invoices:

The Scheduled Invoices page displays, showing existing recurring invoices.
Tip: You can also navigate to the Scheduled Invoices page from Admin > Invoices - Recurring Invoices. - Check the box to the left of one or more Recurring Invoices. Check the box in the header row to select all Recurring Invoices. (This enables the Bulk buttons.)
- Click Bulk Actions to edit the selected Recurring Invoices. Syncro displays the Bulk Edit Invoice Templates pop-up window, which allows you to make edits to many fields:

At the bottom, click Update Selected save your changes to the selected Recurring Invoices. Alternatively, click Delete Selected to remove the selected Recurring Invoices. - Click Bulk Run to run the selected recurring invoices. Syncro displays the Bulk Run Invoices pop-up window, displaying the number of invoices this action applies to. Click Run Invoices Now to confirm. The billing date will advance to the next billing cycle.
View Invoices Created from the Recurring Invoice
To see a list of invoices that have been created from a Recurring Invoice, follow these steps:
- Navigate to the Invoices tab/module.
- From the Invoice Modules button menu, select Recurring Invoices:

The Scheduled Invoices page displays, showing existing recurring invoices.
Tip: You can also navigate to the Scheduled Invoices page from Admin > Invoices - Recurring Invoices. - Click the ellipses icon next to the Recurring Invoice you want to duplicate, then select Edit.
- Scroll to the bottom, where you'll find the Invoice History section:

Syncro displays the Date the invoice was generated and a link to the individual Invoice. You can also see whether each invoice was paid.
View History (Admin Only)
Note: This section is only visible for Global Admins.
Click View History (Admin only) to list modifications made to the Recurring Invoice since its creation. Syncro displays a Date, Employee (name), and Description of the user who made the modification:

Note: You'll need to refresh the page to collapse it again.
 Documentation Center