 Documentation Center
About the Organization Details Page
Table of Contents
The Organization Details Page displays whenever you’re viewing a Customer Organization.
Note: Customers are in the process of being renamed to Organizations, and Contacts to End Users. You may see both in Syncro for the time being.
This document describes what you’ll find on this page, as well as several of its subtabs.
Since the following subtabs have their own dedicated documents, they will not be re-described here:
The Header & Actions Bar

The header bar at the top displays:
- The Organization's Name.
- A button bar, which allows you to work with the Organization. For example, you can create new RMM Installers, Appointments, Invoices, Tickets, etc. using the +New button menu. Here you can also Edit this Organization's information, or use the Actions button menu to Merge, Archive, or Delete the Organization. Use the PDF button menu to create an Organization Label (with barcode) or an Address label for mailing.
- A tab bar, with the Overview subtab highlighted gray to reflect it’s the subtab you’re currently viewing. You can use the Organization's Overview subtab as a quick way to see what's happening and work with your Organization.
The Overview Subtab
Left Sidebar
Overview Section
At the top of the left column you’ll find an Overview section that acts as a mini dashboard:

- At the top is the Organization's outstanding balance, and if Credit(s) exist, the total amount of those. If Statements exist, you can View and/or Email them to the Organization from here.
- You can also click Make Payment to navigate to the New Payment page, where you can apply payment amounts to any open Invoices for this Organization.
- The Total Invoiced amount for this Organization also displays here, so you can see how much revenue you've earned from this Organization to date.
The middle portion shows you the number of Open/Closed Tickets, and Unpaid vs. Total Invoices for the Organization:

- You can add/modify the Organization's Tags here too.
- Data about how quickly and efficiently this Organization's Tickets are being resolved is next. You can learn more about Customer Efficiency reporting here.
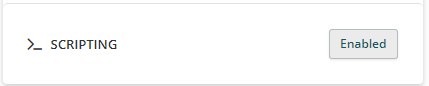
Finally, you can toggle Scripting on/off for this Organization:
Note: If you're using the legacy Entra ID Sync, some information about it will also appear here.
Other Sections
Below the Overview are other sections related to this Organization, including:
- Information: Displays the associated Syncro Tenant and mapped Microsoft Tenant, followed by Organization-level contact information (e.g., Email, Phone, Address), and a link to this Organization's End User Portal, which you can use to see what they see.
-
Mapped Third-Party Apps: If you're using Universal Billing and have mapped a third-party/vendor app to the (Customer) Organization, a link to the Third-Party Vendor Usage report appears in this section:

- Security Groups: If the Customer Organization is included in a Security Group with an Access Type of "Select Customers" the security group name displays in this section.
- Appointments: View upcoming appointments, or create a new appointment with the Organization.
- Reminders: View reminders you previously created, or create a new reminder related to this Organization. Reminders appear for the dates/times you choose.
- Documentation: Create new documentation pages for this Organization. You can upload and attach files, and use Template Tags.
- Notes: Write or revise a quick note related to the Organization. (What you type here doesn't create any type of reminder.)
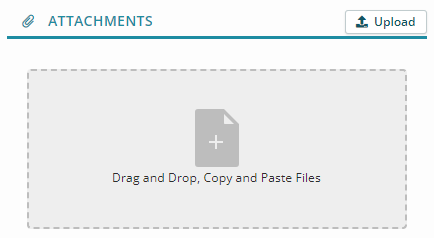
- Attachments: Click Activate Copy/Paste Attachments to enable the drag-and-drop area, or click Upload and select a file:
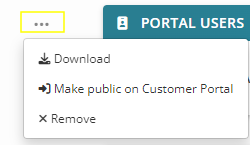
Once a file has been uploaded, click the horizontal ellipsis to Download it, make it available in the End User Portal, or Remove it:
Main Page Area
The larger right column, or main page area, displays various sections that allow you to see what's happening at a glance for this Organization, and in many cases, perform most common actions.
Custom Fields Section
Custom Fields are fields you create and manage to capture any additional information you want in Syncro.
Any Custom Organization Fields you completed in the process of creating or editing an Organization appear here.
Click Edit to change the values of Custom Fields for this Organization.
See also: Custom Fields for Organizations & End Users.
Tickets Section
See the ID, Subject, Created Date and Status for this Organization's most recent Tickets. Quick Preview a Ticket's details using the magnifier icon, or click into individual Ticket numbers. Use the controls in the section's header to filter by Default/Resolved/Unresolved Tickets, to Create a New Ticket for this Organization, or navigate to see all Tickets:

Estimates Section
See the Number, Status, Estimate Name, Created Date, and Total amount for this Organization's most recent Estimates. Quick Preview an Estimate's details using the magnifier icon, or click into individual Estimate numbers. Easily create a New Estimate for this Organization.
Invoices Section
See the Number, Status, Invoice Name, Date, and Total amount for this Organization's most recent Invoices. See which invoices were Paid and those that have/have not had payment applied (Took Payment). Quick Preview an Invoice's details using the magnifier icon, or click into individual Invoice numbers. Use the controls in the section's header to toggle between one-time and recurring invoices, to create a new invoice for this Organization, or navigate to see all Invoices:

Contracts Section
See the Name, Status, Start/End Date, and Est. Amount for this Organization's most recent Contracts. Click into individual Contracts to see the details. Click +New to create a contract for this Organization:

Assets Section
See the Names and Types of the Assets currently being monitored and managed for this Organization. Quick Preview an Asset's details using the magnifier icon, or click into individual Asset names. Use the controls in the section's header to create a new Manual Asset or RMM Agent Installer. Click View All to see all Assets:
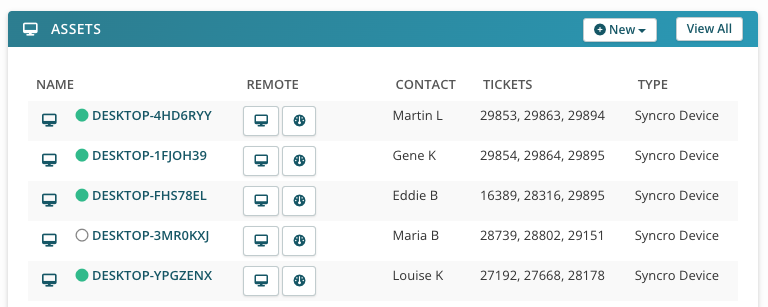
The green bubble means the Asset is online; empty means it's offline. The Remote column may include icons that allow you to access the asset remotely and/or use backgrounding tools.
Payments Section
See the Date payments were taken and how (e.g., “Method” might be ACH, Check, Credit Card, etc.), any note/Message associated with the payment, the Invoice(s) the payment is related to, and the Amounts.
Credits also appear in the PAYMENTS section, which you can expand to apply:

Portal Users Section
A Portal User is an End User at the Organization who has an account that enables them to view information about their Tickets, communicate back and forth with you, and pay you. The End User Portal facilitates another level of communication so the Organization can stay informed about their repairs and work you're doing for them.
Here you can see the list of Portal Users associated with this Organization. Click +New to create a new Portal User for this Organization.
To edit an existing Portal User, click into the Customer/Contact field. If desired, change the Syncro-generated Login to something you'd prefer, then click Save.
You could also click the downward-facing caret to show and edit more details for the Portal User, including their password and MFA.
- Create a strong password using the on-screen tips, and assign this Portal User to the appropriate Portal Group. You can also check the box to require this End User to set up MFA.
- Click Update Portal User to save without sending an email. Click Send Registration Email Instructions to add this End User and send instructions to their email.
Click the red X to delete the Portal User.
Additional Sites/Addresses Section
Click +New to add an additional site/address for this Organization.
Tips:
- This is the same as clicking +Add Another Site/Address when you create an Organization, and any additional sites/addresses you created during that process also appear here.
- Click the location (pin) icon to display the address on Google Maps.
- Click the red X to delete a site/address.
Purchases Section
Purchases is a Syncro feature that allows you to buy hardware/goods (e.g., laptops) from Organizations you support.
This feature sees the most use in break-fix businesses, but often exists in MSP flows. The PURCHASES section displays the Date a purchase happened, the Status, and the amount you paid the Organization.
Click +New to create a new Purchase for this Organization.
You can select an existing Product from your inventory items, or create a product or service on the fly.
Leads Section
The LEADS section displays incoming Leads—initial emails from existing or prospective Organizations/End Users.
Syncro displays the date the Lead was Created, the Subject associated with the Lead (email), and the Status. Click any hyperlinked status to navigate to the "Convert Lead into a Customer and/or Ticket" page and move the Lead along in your process.
Emails Section
The Emails section appears if you create emails from the Organization's +New button menu. Any replies and/or errors related to these emails also display here.
The Other Subtabs
Communications Subtab
The Communications subtab allows you to track various types of interactions with the Organization.
Type what you want to record in the Communication Details text area, select the mode of communication: Email, Phone Call, Visit, or Other, then click Submit.
A date/time-stamped, running list of your Communications appears below.
You can click the horizontal ellipsis to delete individual Communications you no longer want.
Chat History Subtab
The Chat History subtab displays a searchable list of Chats you've had with people in the Organization. The list includes the names of both parties, the relevant Asset, and a date/timestamp of each interaction. You can click into a specific chat to see what was discussed.
History Subtab
Note: This subtab is available for Admins only.
The (Change) History subtab contains a time-stamped, running list of changes made to the Organization. It includes the name of the Employee (Syncro User) who made the change, and a brief description of the setting they changed.