
Create Tickets From the System Tray With Agent Contact Forms
Table of Contents
Agent Contact Forms are forms your customers can use to contact you, directly from the system tray. They are one of the many Policy Modules available in Syncro.
You can use Agent Contact Forms to create more automation within your business, and make communication with your customers easier.
You can create different forms for specific scenarios applicable to your business. For example, you could create one form for customers to use only in “emergency” situations, and another for a “normal” Ticket creation or during “weekend” hours. You can even use different logos in each form to make things clearer for your customers.
The power of this feature is evident in the Ticket automation aspect. When a customer submits the form, Syncro can automatically generate a Ticket in your account. Depending on the Ticket settings you chose to enable within the Contact Form Policy, you can then trigger Ticket Automations based on the Ticket issue type or various custom fields.
Create an Agent Contact Form
Note: This is a one-time set up of a customized Agent Contact Form that you can use with all your Customers.
You can read on, or watch this short video to learn more:
To set up the Agent Contact Form, follow these steps:
- Navigate to the Policies tab/module.
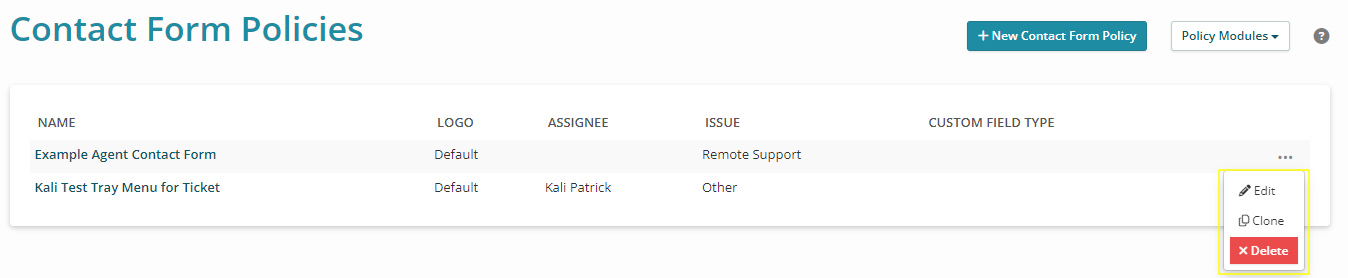
- From the “Policy Modules” dropdown menu in the upper right, select “Agent Contact Forms." The Contact Form Policies table displays.
Tip: Syncro provides the “Example Agent Contact Form” to help you learn what may be helpful to put into a form. - Click +New Contact Form Policy. The New Contact Form Policy page displays.
- In the CONTACT FORM SETTINGS section, complete the fields on the page, including the various pieces of text that make up the Contact Form your customers will see:

Tip: If you uncheck the "Use Account Logo" box, you can enter a URL to a different JPG or PNG image. - In the FORM FIELDS SETTINGS section, mark any fields you’d like to make required.
- In the ERROR MESSAGE SETTINGS section, help customers take the next step by providing information about what they should do if the form does not submit properly.
- In the GENERATED TICKET SETTINGS section, specify how the Ticket gets created in your Syncro account when this Agent Contact Form is submitted. You can preset the Assignee, Issue Type, and Custom Field Type, if desired.
- Click Save Contact Form Policy.
Use the Form Within the System Tray
To use an Agent Contact Form within the system tray, read on, or watch this short video to learn more:
- Navigate to the Policies tab/module.
- Click the hyperlinked Name of the Asset RMM Policy you want to use with the Agent Contact Form to edit it.
- Click the “System Tray” Policy Category on the left side:

- Use the "Add a System Tray Option" dropdown to select “System Tray Section.”
- Uncheck the “Hide System Tray” box, then click +Add.
- Use the “Menu Type” dropdown to select “Agent Contact Form.”
- Enter a customer-facing name in the “Menu Title” field.
- Use the “Contact Form Policy” dropdown menu to select from the available Agent Contact Forms.
- If desired, click +Add and repeat steps 6-8 to add multiple forms that serve different purposes to the same policy.
- Click Save.
Customers will see the form(s) you create this way in their system tray: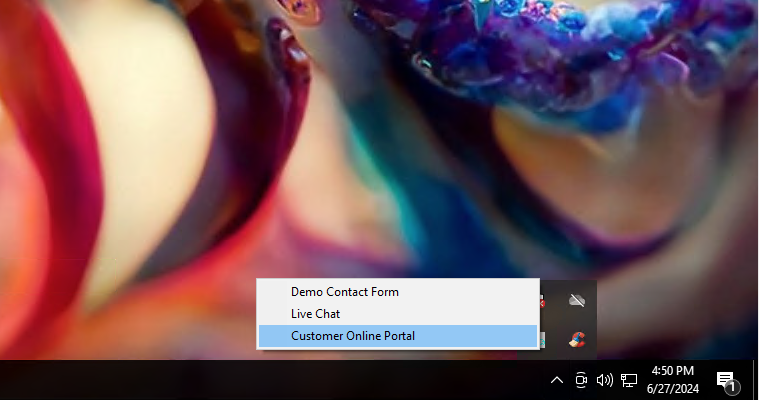
When Customers select one, it looks something like this: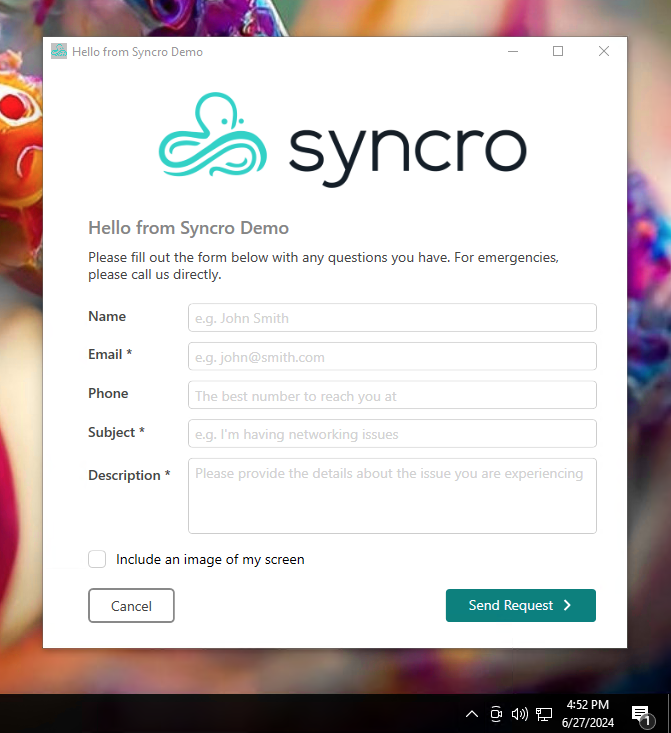
Customers are also given the option to attach a screenshot to form via the “Include an Image of My Screen” checkbox.
About Pre-populated Customer And/or Contact Information
When you've completed the steps described in this document, any Tickets Syncro creates are automatically associated with the Customer for the Asset (or the Contact if one is associated with the Asset).
If a Contact is associated with the Asset, the Contact’s information is auto-populated on the Agent Contact Form. If the Contact decides to edit this information, the information they submit will be attached as a Private Note on the Ticket so your team knows what was entered, without overriding the existing information.
If there is no Contact associated with the Asset, whatever contact information the user provides on the Agent Contact Form will be attached to the Ticket in the form of a Private Note.
Edit, Clone, or Delete an Agent Contact Form
To edit, clone, or delete an existing Agent Contact Form, follow these steps:
- Navigate to the Policies tab/module.
- From the “Policy Modules” dropdown menu in the upper right, select “Agent Contact Forms." The Contact Form Policies table displays.
- Click the ellipsis icon to select your desired action:
- Edit: Displays the Agent Contact Form in edit mode. (Same as clicking the hyperlinked Name from the Contact Form Policies table.) Be sure to click Update Contact Form Policy after making your changes.
- Clone: Creates a copy of the Agent Contact Form. Be sure to give your copy a more meaningful name. Be sure to click Update Contact Form Policy after making your changes.
-
Delete: Deletes the Agent Contact Form after you click OK to confirm.
Note: Be sure to update your policies prior to deleting the agent contact form.