
Customize & Assign Notifications
Table of Contents
Notification Sets allow you to customize which notifications you want, which users receive them, and how those users are notified.
For example, your technicians do not need notifications for any estimates, invoicing, or payments. However, they may need notifications for RMM alerts and appointments.
You can read on, or watch this short video to learn more:
About Notification Sets
- If multiple Notification Sets contain the same Event trigger(s), Syncro will not deduplicate them and you may receive duplicate notifications.
- Any Global Admin can manage Notification Sets to send either to themselves or to other members of their team. Therefore you may receive notifications you did not specify yourself.
- For Events containing the language “My,” “Mine,” and similar, Syncro only sends notifications if the user is also selected in the “Notify These Users” field at the top of the New/Edit Notification Set page.
- For example, a “Ticket - Status was Changed on My Ticket” event would only trigger Syncro to send a notification to you if you are assigned to that Ticket and you are listed in the “Notify These Users” field. If other users are listed in the Notify These Users field, they do not receive the notification because they are not associated with that Ticket.
Default Notification Sets
By default, there are three (3) Notification Sets you can use right away:
- Default: Triggers emails for core flows in Syncro, including Ticket replies, Appointments, Invoice and Estimate updates, etc.
- Mail and SMS Limit Alerts: Triggers emails and in-product notifications for Admins about things like snail mail and SMS credits, etc.
- RMM Alerts: Triggers emails and in-product notifications when an RMM alert is created and an in-product notification for when an Asset is created.
Click the hyperlinked Name or the Edit (pencil) icon to edit these notification sets to customize them for your needs.
Create a New Notification Set
To create a new notification set, follow these steps:
- Navigate to the Notification Center/Manager under Administration > Syncro Administration - Notification Center:

The Notification Sets Manager table displays any existing notification sets. - Click +New Notification Set. The New Notification Set page displays:
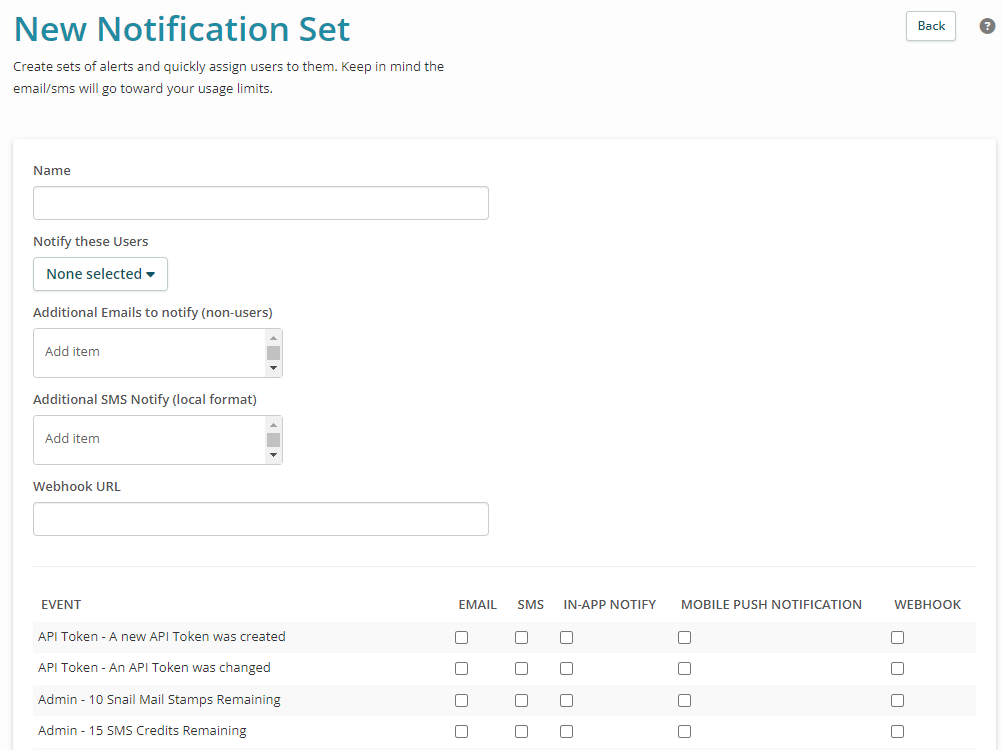
- Create a Name for your Notification Set. This is an internal name only and should be named for how you identify which Users will be assigned this set. For example, "Technicians," "Global Admins," "Billing," or “Dispatch.”
- Select the Users that should receive notifications you choose for this Notification Set.
- (Optional) Add any non-Syncro User emails to receive the notifications. For example, you want to have a "catch-all" email receive all the RMM Alerts from Syncro.
- For each EVENT listed down the left side of the page, specify one or more method of deliveries by checking the boxes.
Methods of Notification Delivery
Syncro provides have five (5) methods for notification delivery:
| Method | Description |
| User receives an email. This uses the information from the User Profile (Admin > Users). | |
| SMS | User receives an SMS to the number specified in their User profile. |
| In-App Notify | User receives a Pop-Up in their Syncro account. This shows in the top right corner when a Syncro instance is open. |
| Mobile Push | User receives a Push notification to the Syncro Mobile App on their mobile device or tablet where the Mobile App was downloaded. |
| Webhook | User receives a Notification to the Webhook URL address. Syncro integrates natively with both Slack and Microsoft Teams. Enable those integrations in the App Center before customizing the set if you want to use those. |