About the Assets & RMM Tab/Page
Table of Contents
This document provides an overview of the information you’ll find in the Assets & RMM tab and the actions you’ll be able to take for one or more asset records in the table that displays on the page. (This is also known as the Assets & RMM module.)
Click the Assets & RMM tab in the Syncro header to display the Assets & RMM page and table.
The Assets & RMM page contains a search feature (1), an action button bar (2), an “Overview and Alerts” dashboard (3), and a table of Assets (4).
Search for an Asset
If you have a long list of assets, you might find it easiest to search for the one you want.
Type a few characters of the Asset's Name (or any asset property), into the Search field (1):

Asset properties include values like serial number, GB, IPs, or even custom field values.
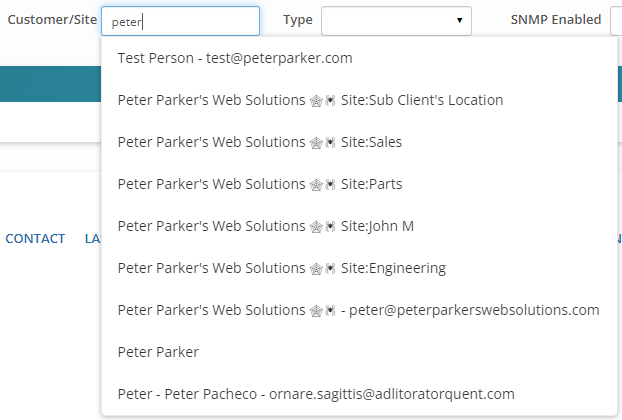
You might also type a few characters for the Customer/Site field. Results display as you type, so you can select one:
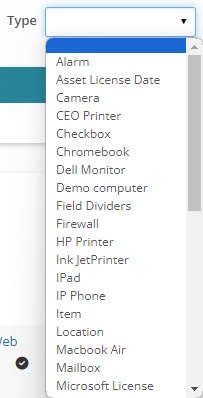
Optionally, select whether SNMP is enabled (true/false) and an (asset) Type:
Now click Search.
Syncro updates the “Overview and Alerts” section and the table beneath it to show your results.
Tips:
- Select “Asset Types” from the View button menu to quickly navigate to the Asset Types page, from which you can view and modify your list of asset types. See Create a Custom Asset Type.
- If you repeatedly search for a set of Assets that meet certain criteria, you may want to create and save a custom asset search. See Create and Save Custom Asset Searches.
Work with Your Assets
The button bar (2) allows you to take several asset-related actions:

Note: The options available in the button bar depend on the assets you've selected in the assets table (4), including how many assets are selected and whether you're viewing assets that are archived.
Click +New Asset to create a new asset at any time. (See also Install a Syncro Agent on a Device.)
Select one or more assets to enable the +New Ticket button. When creating the (single) new ticket, the assets selected must all belong to the same Organization.
Bulk Update Your Assets
Click the checkbox to the left of one or more assets in the table to activate the “Bulk Actions” button menu. Click the header row's checkbox to select/deselect all assets.
Note: For archived assets, the only Bulk Action available is Delete.
Use the Bulk Actions button menu to take the following actions on selected asset(s):
- Remote Access: Opens Backgrounding Tools in a new browser tab. (If you don't have the associated Security Setting enabled, you'll see an “Authentication Failed” message.)
-
Run Script: Allows you to select and run a script on the selected Assets:

Depending on the script you select, additional fields appear. Select Run As (System or Logged In User), the Frequency and When to Run (Now or Schedule). Check the box if you want to skip running the script on assets that are offline. Then click Run.
Note: Any new script schedules set to “Run Now” may take up to 20 minutes before running. (See also: Manage Scripts.) -
Reboot: For Windows machines, allows you to trigger a restart:

-
Maintenance: Allows you to put a Syncro Device into maintenance mode for 5, 10, 15, 30, 60, 120 minutes, 1 day, or 7 days.

IMPORTANT: While an Asset is in maintenance mode, notifications will NOT be sent for RMM alerts. -
Change Customer: Allows you to select a different Customer Organization and/or Policy Folder for the asset:

Note: By default the Customer's top-level Policy Folder is selected, but you can use the dropdown menu to change it. See also About Policy Inheritance. -
Change Asset Type: Allows you to select a different Asset Type:

Note: Some system-defined asset types can't be changed here: Kabuto device, Syncro device, Watchman computer, Ninja computer/monitor/NMS, and N-Central device. -
Toggle Friendly Name: Opens the TOGGLE FRIENDLY NAME pop-up window:

Check the Enable Friendly Name box to pause asset name updates from the host machine, leaving the name available for manual changes. Uncheck it to resume host name syncing for Syncro device-type Assets. -
Send Broadcast Message: Allows you to enter a Title and message Body:
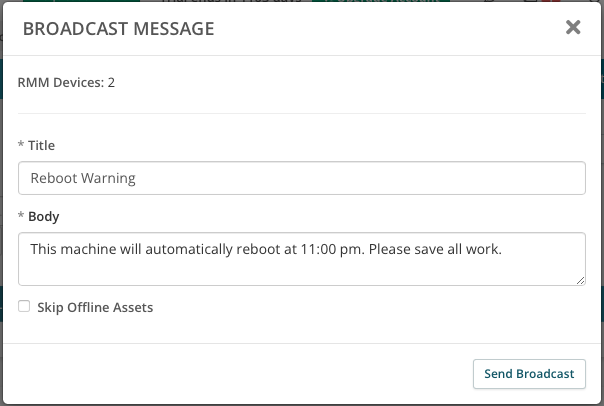
Check the Skip Offline Assets box to ensure your message is only displayed to assets that are currently online. Uncheck it to queue the message for offline assets to see when they come online.
When you click Send Broadcast, a window opens immediately on the selected RMM devices with the Title and message Body you entered. That window displays your company logo and company name.
Note: “Send Broadcast Message” here is similar to the option of the same name in the Actions button menu, but in the Actions version you can also filter by Asset Type. - Print: If you have AutoPrinter configured, you can click Print to print the Asset label. (If you don't have AutoPrinter configured, you'll need to navigate to each Asset, then select the PDF option in the upper-right and print via the browser.)
- Archive: Removes the asset from all tables and views. The next time the asset checks in, the Syncro Agent will be uninstalled. This action is logged with a timestamped event based in the Recent Activity section on the Assets' Details Pages.
-
Delete: This option asks you to confirm before deleting the asset(s):

If the asset is not already archived, clicking Delete Assets sends a command down to the Syncro agent to start an uninstall. If the device is offline, it will receive the command to uninstall the next time it's back online.
Take Actions on Your Assets
Using the Actions button menu, you may be able to select:
-
Broadcast Message: Opens the BROADCAST MESSAGE pop-up window with an Assets Filter Type dropdown menu at the top:

If you choose anything other than All Syncro Devices, you'll be prompted to make additional choices (e.g., to select a Saved Search or Customer). See Bulk Actions for more information about the BROADCAST MESSAGE option. - Export: Click to generate an export file of ALL assets in CSV format, regardless of whether any are selected. Syncro displays the File Downloads page where you'll find the file when it's finished (it has the current date in the file name). If the export doesn't appear right away, wait a few minutes and then refresh the File Downloads page.
- Run Script: Opens the RUN SCRIPT pop-up window, with an Assets Filter Type dropdown menu at the top. This action is not available when any assets are selected. See Bulk Actions for more information about the RUN SCRIPT option.
Navigate to Related Pages
Using the View menu, you can navigate to any of the following pages:
- Archived/Active Assets: Filters and resets the Assets table so you only see archived assets if you want to. The page name changes to let you know which view you're on “All Archived Assets” vs. “All Assets.”
- Asset Types: The Asset Types page, where you can view, create, and modify asset types.
- Automated Remediation: The Automated Remediations page, where you can view, create, clone, and modify automations for alerts.
- OID (Monitor) Recipes: The OID Monitor Recipes page, where you can view, manage, and create new OIDs for SNMP.
- Policies: The Policies tab/page, where you can view, create, and modify policies.
- RMM Alerts: The Open RMM Alerts page where you can view and manage your open RMM alerts.
- Scripts: The Scripts tab/page, where you can view and add scripts. See also Manage Scripts.
Use the Overview and Alerts Dashboard
The Overview and Alerts dashboard gives you an at-a-glance visual representation of what's happening with the assets currently viewable in the assets table (3):

This dashboard displays the following information:
- Computers with Alerts: the number of Syncro devices with open RMM alerts. Click the hyperlinked number (in this example, “2”), to filter the assets table to display only those devices.
- Computers Without AV: the number of Syncro devices currently without an installed antivirus software. Click the hyperlinked number (in this example, “5” to filter the assets table to display only those devices. See also Contact Customers with Missing Antivirus.
- Alerts by Computer: pie chart that breaks down what percentage/portion of alerts each computer is responsible for. Click a pie wedge to view the Open RMM Alerts page scoped to that asset.
- Alerts by Type: pie chart that breaks down the percentage/portion of alerts by their type. Click a pie wedge to view the Open RMM Alerts page that only displays assets with that alert type.
- Operating Systems: pie chart that breaks down the percentage/portion of alerts by their type. Click a pie wedge to view filter the assets table to display only assets with that operating system.
Tip: If you want to hide the dashboard to see more of the assets table, click the caret in the upper right corner of the Overview and Alerts section.
Use and Customize the Assets Table
Beneath the Overview and Alerts Dashboard, the Assets Table (4) displays lots of information about your Syncro assets:

The upper right corner of the table displays your total number of assets (in this example, "69 ASSETS").
By default, the Assets table contains columns for each Asset Name (including its form factor icon, online/offline status indicator, and Quick Preview), Remote options, Customer, OS Name, OS Architecture, CPU Name, RAM GB, and HDD Size. You can always customize which columns display.
Watch this short video to learn more:
A green dot next to a machine shows you that it's online; an empty dot indicates it's offline. Manually created assets--such as printers--have no online status indicator. If available (i.e., it's a Syncro device and you have appropriate remote access permissions), the REMOTE column displays icons to give you instant Remote Access to the asset and/or to Backgrounding Tools for the asset. Interactive and real-time tools (e.g., online status, remote access, etc.) are suppressed or removed for archived assets.
Tips:
- The Contact and Site/Address are also clickable/in-line editable.
- Click Customize (the button with the wheel icon
 ) in the top left part of the table to change which columns appear in the Assets table, and use the triple line icon (
 ) to drag them into your desired order:
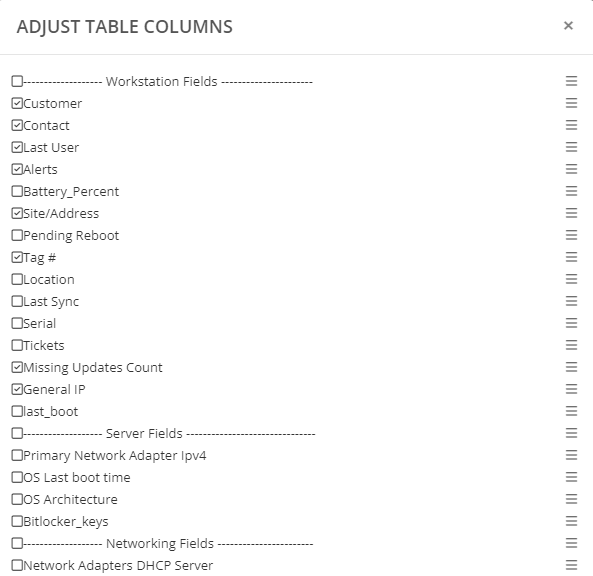
Some common columns we see enabled include: Last User (last or current if still online user), General IP (public WAN IP), Primary Network Adapter Ipv4 (local LAN IP address), Last Boot Time (last time the machine rebooted), and System Partition Free Percent (free space left on the main drive).
Click Save for your changes to take effect.
Sort and Preview Asset Information
Regardless of how many assets you have, you may want to click one of the hyperlinked table header fields to sort your Assets list:

You can sort on Name and any applicable asset properties. (However, you can't sort on online status, remote access, or any custom fields.) A triangle icon indicates which column you’re currently sorting by, and whether the sort is ascending or descending. Click again to toggle between ascending and descending order.
Click on the hyperlinked Name of your asset to display its Details Page.
To preview an asset's information instead, hover over its icon until it changes into the Quick Preview magnifier. When it changes into a tooltip that conveys what the asset is (for example, “Virtual Desktop/Laptop” or “Physical Desktop/Laptop,” or simply, “More Info" for things like printers and monitors), click again:

Open this asset's Details Page using the arrow in the upper right, or click the x to close the preview.
Create & Save Custom Asset Searches
If you repeatedly search for a set of Assets that meet certain criteria, you may want to create and save a custom asset search. Saved Asset Searches are used in other parts of the platform, such as automated billing, running scripts, and generating reports.
For example, if you want to regularly reach out to customers whose assets are missing an antivirus, you can create a custom asset search with the “Missing Antivirus” box checked to locate them. See also Contact Customers with Missing Antivirus.
You can read on, or watch this short video to learn more:
To create and save a new custom asset search, follow these steps:
- On the left side of the Assets tab/page is a magnifying glass icon with a + on it, which will follow you as you scroll down the page:

- Click it to open the Saved Asset Search sidebar:

- Click New Search. Syncro displays the New Saved Asset Search pop-up window:
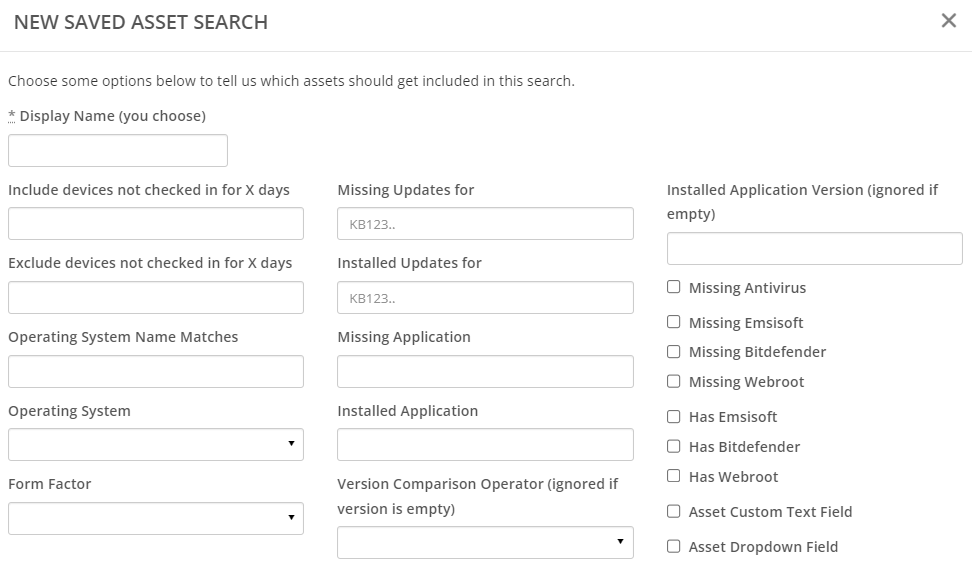
Specify your criteria, then click Save. Your Saved Asset Search now appears in the Saved Search sidebar.
Tip: You can always click the magnifying glass icon to return to your saved asset searches.
Use a Saved Asset Search
- Follow steps 1 & 2 in Create and Save Custom Asset Searches to open the Saved Asset Search sidebar.
- Click the hyperlinked search name to display those results in the Assets table on the right side of the page:
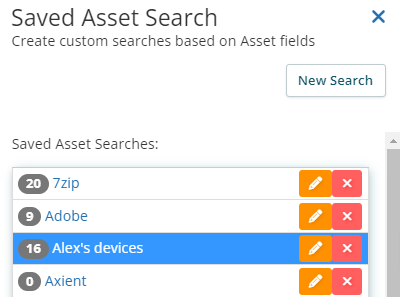
Tip: The number in gray shows the number of results.
Syncro highlights the selected search in blue, and filters the assets page (dashboard and table) based on your search: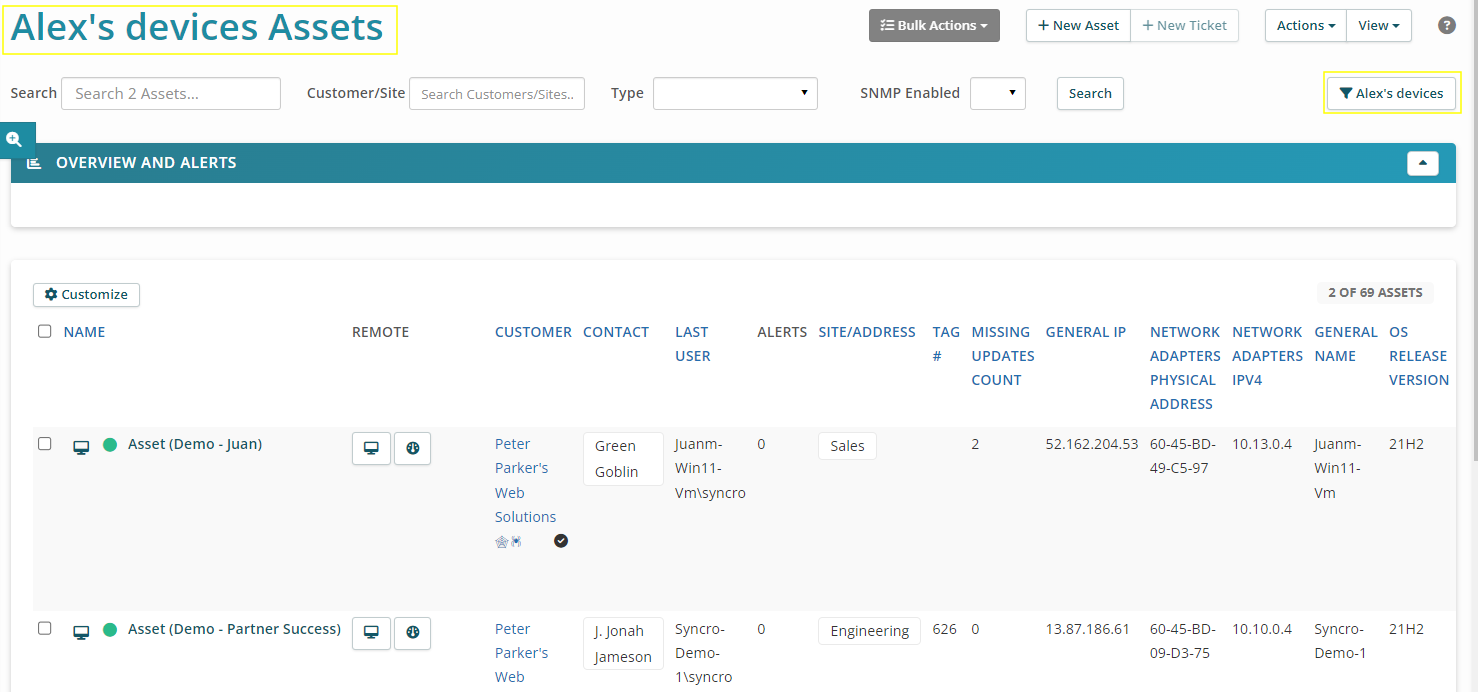
The "Saved Search" filter button at the far right of the page also changes to reflect the name of the saved asset search you selected.
To remove the search filter, click the button and choose “All”. Alternatively, choose another saved asset search from the list: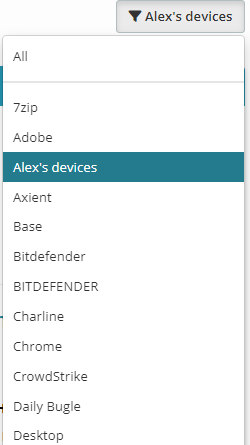
Edit or Delete a Saved Asset Search
If you want to edit or delete a Saved Asset Search, follow these steps:
- Follow steps 1 & 2 in Create and Save Custom Asset Searches to open the Saved Asset Search sidebar.
- Use the Edit (pencil) and Delete (red x) icons in the left Saved Asset Search panel:

